概述 Egg.js 为企业级框架和应用而生 ,我们希望由 Egg.js 孕育出更多上层框架,帮助开发团队和开发人员降低开发和维护成本。
起步 api 开发配置
关闭csrf
1 2 3 4 5 6 config.security = { csrf : { enable : false , }, };
安装mysql套件
1 npm install --save egg-sequelize mysql2
在config/plugin.js中引入 egg-sequelize 插件
1
2
3
4
exports .sequelize = { enable : true , package : 'egg-sequelize' , };
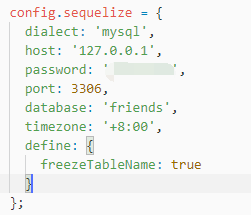
在config/config.default.js中编写 sequelize 配置
1
2
3
4
5
6
7
8
9
10
11
12
13
14
15
16
17
18
19
20
21
22
23
24
25
26
27
28
config.sequelize = { dialect : 'mysql' , host : '127.0.0.1' , password : 'admin888' , port : 3306 , database : 'weibo' , timezone : '+08:00' , define : { freezeTableName : true , timestamps : true , paranoid : true , createdAt : 'created_at' , updatedAt : 'updated_at' , deletedAt : 'deleted_at' , underscored : true } };
路由 api版本控制 resfulApi 路由版本控制
插件配置
1 2 3 4 5 exports .routerPlus = { enable : true , package : 'egg-router-plus' , };
1
2
3
4
5
6
7
8
9
module .exports = app => const { router, controller } = app; const apiV1Router = router.namespace('/api/v1' ) apiV1Router.post('/home' , controller.home.index) };
错误和异常 全局异常处理 egg resfulAPI 全局异常处理 统一错误处理
自定义一个异常基类
1
2
3
4
5
6
7
8
9
10
class HttpExceptions extends Error constructor (msg='服务器异常' , code=1 , httpCode=400 ) super () this .code = code; this .msg = msg; this .httpCode = httpCode; } } module .exports = { HttpExceptions };
定义全局异常处理中间件
1
2
3
4
5
6
7
8
9
10
11
12
13
14
15
16
17
18
19
20
21
22
23
24
25
26
27
28
29
30
31
32
33
34
35
const { HttpExceptions } = require ('../exceptions/http_exceptions' );module .exports = () => { return async function errorHandler (ctx, next ) try { await next(); } catch (err) { ctx.app.emit('error' , err, ctx); let status = err.status || 500 ; let error = {}; if (err instanceof HttpExceptions) { status = err.httpCode error.requestUrl = `${ctx.method} : ${ctx.path} ` ; error.msg = err.msg; error.code = err.code; error.httpCode = err.httpCode; } else { error.errsInfo = status === 500 && ctx.app.config.env === 'prod' ? 'Internal Server Error' : err.message; } ctx.body = error; if (status === 422 ) { ctx.body.detail = err.errors; } ctx.status = status; } }; };
数据库 egg.js 数据库迁移 文档:https://eggjs.org/zh-cn/tutorials/sequelize.html
sequelize 数据库迁移命令
命令
含义
sequelize db:migrate
运行迁移文件
sequelize db:migrate:status
列出所有迁移的状态
sequelize db:migrate:undo
隔离数据库:迁移:撤消
sequelize db:migrate:undo:all
还原所有运行的迁移
sequelize db:create
创建由配置指定的数据库
sequelize db:drop
删除由配置指定的数据库
配置
安装并配置egg-sequelize 插件(它会辅助我们将定义好的 Model 对象加载到 app 和 ctx 上)和mysql2 模块:
1 npm install --save egg-sequelize mysql2
在config/plugin.js中引入 egg-sequelize 插件
1
2
3
4
exports.sequelize = { enable: true, package: 'egg-sequelize', };
在config/config.default.js中编写 sequelize 配置
1
2
3
4
5
6
7
8
9
10
11
config.sequelize = { dialect : 'mysql' , host : '127.0.0.1' , password : 'xxxx' , port : 3306 , database : 'friends' , timezone : '+8:00' , define : { freezeTableName : true } };
sequelize 提供了sequelize-cli 工具来实现Migrations ,我们也可以在 egg 项目中引入 sequelize-cli。
1 npm install --save-dev sequelize-cli
在 egg 项目中,我们希望将所有数据库 Migrations 相关的内容都放在database目录下,所以我们在项目根目录下新建一个.sequelizerc配置文件:
1
2
3
4
5
6
7
8
9
10
'use strict' ;const path = require ('path' );module .exports = { config : path.join(__dirname, 'database/config.json' ), 'migrations-path' : path.join(__dirname, 'database/migrations' ), 'seeders-path' : path.join(__dirname, 'database/seeders' ), 'models-path' : path.join(__dirname, 'app/model' ), };
初始化 Migrations 配置文件和目录
1
2
3
npx sequelize init:config npx sequelize init:migrations npx sequelize init:models
执行完后会生成database/config.json文件和database/migrations目录,我们修改一下database/config.json中的内容,将其改成我们项目中使用的数据库配置:
1
2
3
4
5
6
7
8
9
10
{ "development" : { "username" : "root" , "password" : null , "database" : "egg-sequelize-doc-default" , "host" : "127.0.0.1" , "dialect" : "mysql" , "operatorsAliases" : false } }
创建数据库npx sequelize db:create
创建数据迁移表 1 npx sequelize migration:generate --name=init-users
1.执行完命令后,会在database / migrations / 目录下生成数据表迁移文件,然后定义
1
2
3
4
5
6
7
8
9
10
11
12
13
14
15
16
17
18
19
20
21
22
23
24
25
26
27
'use strict' ;module .exports = { up : async (queryInterface, Sequelize) => { const { INTEGER, STRING, DATE, ENUM } = Sequelize; await queryInterface.createTable('users' , { id : { type : INTEGER(20 ).UNSIGNED, primaryKey : true , autoIncrement : true }, username : { type : STRING(30 ), allowNull : false , defaultValue : '' , comment : '用户名称' , unique : true }, email : { type : STRING(160 ), allowNull : false , defaultValue : '' , comment : '用户邮箱' , unique : true }, password : { type : STRING(200 ), allowNull : false , defaultValue : '' }, avatarUrl : { type : STRING(200 ), allowNull : true , defaultValue : '' }, mobile : { type : STRING(20 ), allowNull : false , defaultValue : '' , comment : '用户手机' , unique : true }, prifix : { type : STRING(32 ), allowNull : false , defaultValue : '' }, abstract : { type : STRING(255 ), allowNull : true , defaultValue : '' }, gender : { type : ENUM, values : ['男' ,'女' ,'保密' ], allowNull : true , defaultValue : '男' , comment : '用户性别' }, createdAt : DATE, updatedAt : DATE }, { engine : 'MYISAM' }); queryInterface.addIndex('users' , ['gender' ]) }, down : async queryInterface => { await queryInterface.dropTable('users' ) } };
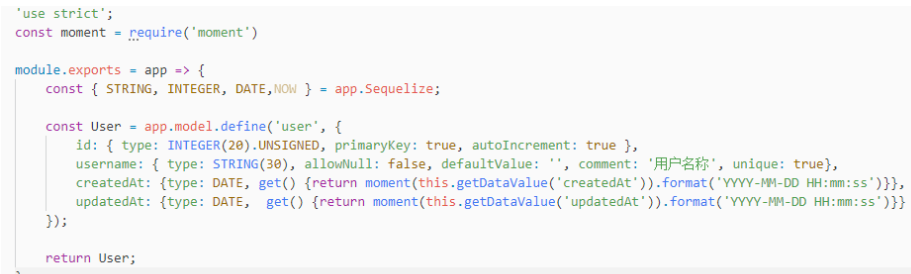
创建数据模型 app / model / user.js
引入日期处理类库 Moment.js
1
2
3
4
5
6
7
8
9
10
11
12
13
14
15
16
17
18
19
20
21
'use strict' ;const moment = require ('moment' )module .exports = app => const { STRING, INTEGER, DATE } = app.Sequelize; const User = app.model.define('users' , { id : { type : INTEGER(20 ).UNSIGNED, primaryKey : true , autoIncrement : true }, username : { type : STRING(30 ), allowNull : false , defaultValue : '' , comment : '用户名称' , unique : true }, email : { type : STRING(160 ), allowNull : false , defaultValue : '' , comment : '用户邮箱' , unique : true }, password : { type : STRING(200 ), allowNull : false , defaultValue : '' }, avatarUrl : { type : STRING(200 ), allowNull : true , defaultValue : '' }, mobile : { type : STRING(20 ), allowNull : false , defaultValue : '' , comment : '用户手机' , unique : true }, prifix : { type : STRING(32 ), allowNull : false , defaultValue : '' }, abstract : { type : STRING(255 ), allowNull : true , defaultValue : '' }, gender : { type : ENUM, values : ['男' ,'女' ,'保密' ], allowNull : true , defaultValue : '男' , comment : '用户性别' }, createdAt : {type : DATE, get (return moment(this .getDataValue('createdAt' )).format('YYYY-MM-DD HH:mm:ss' )}}, updatedAt : {type : DATE, get (return moment(this .getDataValue('updatedAt' )).format('YYYY-MM-DD HH:mm:ss' )}} }); return User; };
sequelize数据类型 sequelize 数据类型 1 2 3 4 5 6 7 8 9 10 11 12 13 14 15 16 17 18 19 20 21 22 23 24 25 26 27 28 29 30 31 32 33 34 35 36 37 38 39 40 41 42 43 44 45 46 47 48 49 50 51 52 53 54 55 56 57 58 59 60 61 62 63 64 Sequelize.INTEGER.UNSIGNED Sequelize.INTEGER(11 ).UNSIGNED Sequelize.INTEGER(11 ).ZEROFILL Sequelize.INTEGER(11 ).ZEROFILL.UNSIGNED Sequelize.INTEGER(11 ).UNSIGNED.ZEROFILL Sequelize.STRING Sequelize.STRING(1234 ) Sequelize.STRING.BINARY Sequelize.TEXT Sequelize.TEXT('tiny' ) Sequelize.CITEXT Sequelize.INTEGER Sequelize.BIGINT Sequelize.BIGINT(11 ) Sequelize.FLOAT Sequelize.FLOAT(11 ) Sequelize.FLOAT(11 , 10 ) Sequelize.REAL Sequelize.REAL(11 ) Sequelize.REAL(11 , 12 ) Sequelize.DOUBLE Sequelize.DOUBLE(11 ) Sequelize.DOUBLE(11 , 10 ) Sequelize.DECIMAL Sequelize.DECIMAL(10 , 2 ) Sequelize.DATE Sequelize.DATE(6 ) Sequelize.DATEONLY Sequelize.BOOLEAN Sequelize.ENUM('value 1' , 'value 2' ) Sequelize.ARRAY(Sequelize.TEXT) Sequelize.ARRAY(Sequelize.ENUM) Sequelize.JSON Sequelize.JSONB Sequelize.BLOB Sequelize.BLOB('tiny' ) Sequelize.UUID Sequelize.CIDR Sequelize.INET Sequelize.MACADDR Sequelize.RANGE(Sequelize.INTEGER) Sequelize.RANGE(Sequelize.BIGINT) Sequelize.RANGE(Sequelize.DATE) Sequelize.RANGE(Sequelize.DATEONLY) Sequelize.RANGE(Sequelize.DECIMAL) Sequelize.ARRAY(Sequelize.RANGE(Sequelize.DATE)) Sequelize.GEOMETRY Sequelize.GEOMETRY('POINT' ) Sequelize.GEOMETRY('POINT' , 4326 )
配置 sequelize 数据库配置 1 2 3 4 5 6 7 8 9 10 11 12 13 14 15 16 17 18 19 20 21 22 23 24 25 26 27 28 29 30 31 class Bar extends Model {} Bar.init({ /* bla */ }, { // 模型的名称. 该模型将以此名称存储在`sequelize.models`中. // 在这种情况下,默认为类名,即Bar. // 这将控制自动生成的foreignKey和关联命名的名称 modelName: 'bar', // 不添加时间戳属性 (updatedAt, createdAt) timestamps: false, // 不删除数据库条目,但将新添加的属性deletedAt设置为当前日期(删除完成时). // paranoid 只有在启用时间戳时才能工作 paranoid: true, // 将自动设置所有属性的字段参数为下划线命名方式. // 不会覆盖已经定义的字段选项 underscored: true, // 禁用修改表名; 默认情况下,sequelize将自动将所有传递的模型名称(define的第一个参数)转换为复数. 如果你不想这样,请设置以下内容 freezeTableName: true, // 定义表的名称 tableName: 'my_very_custom_table_name', // 启用乐观锁定. 启用时,sequelize将向模型添加版本计数属性, // 并在保存过时的实例时引发OptimisticLockingError错误. // 设置为true或具有要用于启用的属性名称的字符串. version: true, // Sequelize 实例 sequelize, })
如果你希望sequelize处理时间戳,但只想要其中一部分,或者希望你的时间戳被称为别的东西,则可以单独覆盖每个列:
1 2 3 4 5 6 7 8 9 10 11 12 13 14 15 16 17 class Foo extends Model {} Foo.init({ /* bla */ }, { // 不要忘记启用时间戳! timestamps: true, // 我不想要 createdAt createdAt: false, // 我想 updateAt 实际上被称为 updateTimestamp updatedAt: 'updateTimestamp', // 并且希望 deletedA t被称为 destroyTime(请记住启用paranoid以使其工作) deletedAt: 'destroyTime', paranoid: true, sequelize, })
你也可以更改数据库引擎,例如 变更到到MyISAM, 默认值是InnoDB.
1 2 3 4 5 6 7 8 9 10 class Person extends Model Person.init({ }, { engine : 'MYISAM' , sequelize }) const sequelize = new Sequelize(db, user, pw, { define : { engine : 'MYISAM' } })
最后,你可以为MySQL和PG中的表指定注释
1 2 3 4 5 class Person extends Model Person.init({ }, { comment : "我是一个表注释!" , sequelize })
索引 Sequelize支持在Model.sync()或sequelize.sync中创建的模型定义中添加索引.
1 2 3 4 5 6 7 8 9 10 11 12 13 14 15 16 17 18 19 20 21 22 23 24 25 26 27 28 29 30 31 32 33 34 35 class User extends Model User.init({}, { indexes : [ { unique : true , fields : ['email' ] }, { fields : ['data' ], using : 'gin' , operator : 'jsonb_path_ops' }, { name : 'public_by_author' , fields : ['author' , 'status' ], where : { status : 'public' } }, { name : 'title_index' , method : 'BTREE' , fields : ['author' , {attribute : 'title' , collate : 'en_US' , order : 'DESC' , length : 5 }] } ], sequelize });
连接配置 1 2 3 4 5 6 7 8 9 10 11 12 13 14 15 16 17 18 19 20 21 22 23 24 25 26 27 28 config.sequelize = { dialect : 'mysql' , host : '127.0.0.1' , password : 'admin888' , port : 3306 , database : 'weibo' , timezone : '+08:00' , define : { freezeTableName : true , timestamps : true , paranoid : true , createdAt : 'created_at' , updatedAt : 'updated_at' , deletedAt : 'deleted_at' , underscored : true } };
新增 sequelize 新增一条数据 查询 条件查询 1 2 3 4 5 6 7 8 9 10 11 12 13 14 15 16 17 18 19 20 21 22 23 24 25 26 27 28 29 30 31 32 33 const Op = Sequelize.Op [Op.and]: {a: 5} // 且 (a = 5) [Op.or]: [{a: 5}, {a: 6}] // (a = 5 或 a = 6) [Op.gt]: 6, // id > 6 [Op.gte]: 6, // id >= 6 [Op.lt]: 10, // id < 10 [Op.lte]: 10, // id <= 10 [Op.ne]: 20, // id != 20 [Op.eq]: 3, // = 3 [Op.not]: true, // 不是 TRUE [Op.between]: [6, 10], // 在 6 和 10 之间 [Op.notBetween]: [11, 15], // 不在 11 和 15 之间 [Op.in]: [1, 2], // 在 [1, 2] 之中 [Op.notIn]: [1, 2], // 不在 [1, 2] 之中 [Op.like]: '%hat', // 包含 '%hat' [Op.notLike]: '%hat' // 不包含 '%hat' [Op.iLike]: '%hat' // 包含 '%hat' (不区分大小写) (仅限 PG) [Op.notILike]: '%hat' // 不包含 '%hat' (仅限 PG) [Op.startsWith]: 'hat' // 类似 'hat%' [Op.endsWith]: 'hat' // 类似 '%hat' [Op.substring]: 'hat' // 类似 '%hat%' [Op.regexp]: '^[h|a|t]' // 匹配正则表达式/~ '^[h|a|t]' (仅限 MySQL/PG) [Op.notRegexp]: '^[h|a|t]' // 不匹配正则表达式/!~ '^[h|a|t]' (仅限 MySQL/PG) [Op.iRegexp]: '^[h|a|t]' // ~* '^[h|a|t]' (仅限 PG) [Op.notIRegexp]: '^[h|a|t]' // !~* '^[h|a|t]' (仅限 PG) [Op.like]: { [Op.any]: ['cat', 'hat']} // 包含任何数组['cat', 'hat'] - 同样适用于 iLike 和 notLike [Op.overlap]: [1, 2] // && [1, 2] (PG数组重叠运算符) [Op.contains]: [1, 2] // @> [1, 2] (PG数组包含运算符) [Op.contained]: [1, 2] // <@ [1, 2] (PG数组包含于运算符) [Op.any]: [2,3] // 任何数组[2, 3]::INTEGER (仅限PG) [Op.col]: 'user.organization_id' // = 'user'.'organization_id', 使用数据库语言特定的列标识符, 本例使用 PG
数据表结构
id
name
age
sex
address
math
english
张三
23
男
18
云南
60
40
李四
23
女
22
贵州
20
30
王麻子
23
男
30
玉溪
30
26
赵六
23
女
26
德州
80
38
刘能
23
女
19
西凉
100
48
段鱼
23
男
28
广州
60
52
琳娜
23
男
34
泰国
40
46
贝利
23
男
42
美国
50
69
皮特
23
女
50
英国
38
70
汤姆
23
男
46
缅甸
42
65
1 2 3 4 5 6 7 8 9 model.findAll({ attributes : ['name' , 'age' ], where : { age : { [Op.gt]:20 } } })
1 2 3 4 5 6 7 8 9 10 11 12 model.findAll({ attributes : ['name' , 'age' ], where : { age : { [Op.and]: { [Op.gt]:20 , [Op.lt]:30 } } } }) `student` .`age` > 20 AND `student` .`age` < 30
1 2 3 4 5 6 7 8 9 model.findAll({ attributes : ['name' , 'age' ], where : { age : { [Op.in]: [26 ,28 ,52 ] } } }); `student` .`age` IN (26 , 28 , 52 )
1 2 3 4 5 6 7 8 9 model.findAll({ attributes :['name' ,'english' ], where : { english : { [Op.is]:null } } }) `student` .`english` IS NULL
1 2 3 4 5 6 7 8 9 Student.findAll({ attributes :['name' ,'english' ], where : { english : { [Op.not]:null } } }) `student` .`english` IS NOT NULL
模糊查询
1 2 3 4 5 6 7 8 9 10 11 12 const { field = '' } = ctx.queryconst fields = field.split(';' ).filter(f =>Student.findAll({ attributes : fields.length === 0 ? '' : fields, where : { name : { [Op.like]:'%马%' } } }) `student` .`name` LIKE '%马%'
1 2 3 4 5 6 7 8 9 10 11 12 13 const { field = '' } = ctx.queryconst fields = field.split(';' ).filter(f =>const ret = await Student.findAll({ attributes : fields.length === 0 ? '' : fields, where : { name : { [Op.like]:'_中%' } } }) `student` .`name` LIKE '_中%'
1 2 3 4 5 6 7 8 9 10 11 12 13 14 const { field = '' } = ctx.queryconst fields = field.split(';' ).filter(f =>const ret = await Student.findAll({ attributes : fields.length === 0 ? '' : fields, where : { name : { [Op.like]:'___' } } }) `student` .`name` LIKE '___'
排序查询 数学成绩从高到低排序 1 2 3 4 5 6 7 8 9 10 11 const { field = '' } = ctx.queryconst fields = ctx.helper.filterFields(field)const ret = await Student.findAll({ attributes : fields, order : [ ['math' , 'DESC' ] ] }) ORDER BY `student` .`math` DESC;
按照数学成绩排序,如果数学成绩一样,才按照英语成绩倒序排序
注意!!! 存在多排序条件时,首先满足第一排序条件,才会执行第二排序条件
1 2 3 4 5 6 7 8 9 10 11 12 const { field = '' } = ctx.queryconst fields = ctx.helper.filterFields(field)const ret = await Student.findAll({ attributes : fields, order : [ ['math' , 'ASC' ], ['english' , 'DESC' ] ] }) ORDER BY `student` .`math` ASC, `student` .`english` DESC;
聚合查询
注意!!! 使用聚合功能时,必须给它一个别名,以便能够从模型中访问它
COUNT 计算数量 1 2 3 4 5 6 7 8 9 10 11 const { Sequelize } = app;const ret = await Student.findAll({ attributes : [ [Sequelize.fn('COUNT' , Sequelize.col('name' )), 'no_name' ] ] }) SELECT COUNT(`name` ) from Student [{"no_name" :12 }]
MAX 计算最大值 1 2 3 4 5 const { Sequelize } = app;const ret = await Student.findAll({ attributes :[[Sequelize.fn('MAX' ,Sequelize.col('english' )), 'english_max' ]] })
MIN 计算最小值 1 2 3 4 const ret = await Student.findAll({ attributes :[[Sequelize.fn('MIN' ,Sequelize.col('english' )), 'english_min' ]] })
SUN 求和 1 2 3 4 5 6 const { Sequelize } = app;const ret = await Student.findAll({ attributes :[[Sequelize.fn('SUM' ,Sequelize.col('english' )), 'english_sum' ]] }) SELECT SUM(`english` ) FROM ...
AVG 平均值 1 2 3 4 5 6 const { Sequelize } = app;const ret = await Student.findAll({ attributes :[[Sequelize.fn('AVG' ,Sequelize.col('english' )), 'english_avg' ]] }) SELECT AVG(`english` ) FROM ...
分组查询 GROUP 分组查询
分组查询,顾名思义就是按照组区分开,进行查询,比如按照性别分组
按照性别分组查询全部数学成绩的平均分
1 2 3 4 5 6 7 8 9 10 11 12 13 14 15 16 17 18 19 20 21 const { Sequelize } = app;const ret = await Student.findAll({ attributes :['sex' , [ Sequelize.fn('AVG' , Sequelize.col('math' )), 'math_avg' ] ], group : ['sex' ] }) SELECT `sex` , AVG(`math` ) FROM `student` GROUP BY `sex` ; [ { "sex" : "女" , "math_avg" : "85.4286" }, { "sex" : "男" , "math_avg" : "78.0000" } ]
按照性别分组,分别查询全班同学数学成绩平均分和总人数
1 2 3 4 5 6 7 8 9 10 11 12 13 14 15 16 17 18 19 20 21 22 23 24 const ret = await Student.findAll( { attributes :[ 'sex' , [Sequelize.fn('AVG' , Sequelize.col('math' )), 'match_avg' ], [Sequelize.fn('COUNT' , Sequelize.col('id' )), 'total_student' ] ], group : ['sex' ] } ) SELECT `sex` , AVG(`math` ) , COUNT(`id` ) FROM `student` GROUP BY `sex` ; [ { "sex" : "女" , "match_avg" : "85.4286" , "total_student" : 7 }, { "sex" : "男" , "match_avg" : "78.0000" , "total_student" : 5 } ]
按照地区分组,分别统计每个地区数学成绩平均分 和 总人数,分数低于70分的同学不参与分组
1 2 3 4 5 6 7 8 9 10 11 12 13 14 15 16 17 18 19 20 21 22 23 24 25 26 27 28 29 30 31 32 33 34 35 36 37 38 39 40 41 42 43 44 const ret = await Student.findAll( { attributes :[ 'address' , [ Sequelize.fn('AVG' , Sequelize.col('math' )), 'math_avg' ], [ Sequelize.fn('COUNT' , Sequelize.col('id' )), 'total_student' ] ], where : { math : { [Op.gt]:70 } }, group : ['address' ] } ) SELECT `address` , AVG(`math` ) , COUNT(`id` ) FROM `student` WHERE `math` > 70 GROUP BY `address` ; [ { "address" : "四川" , "math_avg" : "84.0000" , "total_student" : 2 }, { "address" : "昆明" , "math_avg" : "90.0000" , "total_student" : 1 }, { "address" : "潭州" , "math_avg" : "92.0000" , "total_student" : 1 }, { "address" : "西凉" , "math_avg" : "82.0000" , "total_student" : 2 }, { "address" : "贵州" , "math_avg" : "86.2500" , "total_student" : 4 } ]
按照地区分组,分别统计每个地区学生的数学平均分,分数低于70分的同学不参与分组,并且参与分组的人数不能少于2人
注意!!!where 和 having 的区别?
1 2 3 4 5 6 7 8 9 10 11 12 13 14 15 16 17 18 19 20 21 22 await Student.findAll( { attributes :[ 'address' , [Sequelize.fn('AVG' , Sequelize.col('math' )), 'math' ], [Sequelize.fn('COUNT' , Sequelize.col('id' )), 'total' ] ], where : { math : { [Op.gt]:70 } }, group : 'address' , having : { total :{ [Op.gt]:2 } } }) SELECT `address` , AVG(`math` ),COUNT(`id` ) as total FROM `student` WHERE `student` > 70 GROUP BY `address` HAVING `total` > 2 ;
分页查询 limt 分页查询 查询前3条记录
分页公式:(offset - 1) * limit
1 2 3 4 5 6 7 8 9 SELECT name FROM `student` LIMIT 0 , 3 ; Student.findAll( { attributes :['name' ], offset :0 , limit :3 })
分页案例
1 2 3 4 5 6 7 8 9 10 11 12 13 14 15 16 17 18 19 20 21 22 router.get('/getUserList' , async (ctx, next) => { let { currentPage=1 , count=10 } = ctx.request.header; const userList = await models.user.findAllAndCount({ limit : parseInt ( count ), offset :(currentPage - 1 ) * count, include : [{ model : { explore }, as : 'order_info' }], distinct : true }).then(res => let result = {}; result.data = res.rows; result.totalCount = res.count; return result; }); ctx.body = userList; });
修改 1 2 3 4 5 6 7 8 9 10 11 12 13 14 15 16 17 async update ( const ctx = this .ctx; const id = 106 ; const user = await ctx.model.User.findByPk(id); if (!user) { ctx.status = 404 ; return ; } await user.update({ name :"李四" , age :43 }); ctx.body = user; } wait User.update({ lastName : "Doe" }, { where : { lastName : null } });
删除 删除数据
force 设置为true 时,不进行物理删除,只是软删除model.destroy( { where:{ id:this.ctx.params.id }}, { force: true } )model.restore()model.restore( { where: { id: 2 } } )
获取器 get() 获取器,查询数据时触发
1 2 3 4 5 6 7 8 9 10 11 12 13 14 15 'use strict' ;const moment = require ('moment' )module .exports = app => const { STRING, INTEGER, DATE } = app.Sequelize; const User = app.model.define('users' , { id : { type : INTEGER(20 ).UNSIGNED, primaryKey : true , autoIncrement : true }, gender : { type : ENUM, values : ['男' ,'女' ,'保密' ], allowNull : true , defaultValue : '男' , comment : '用户性别' }, createdAt : {type : DATE, get (return moment(this .getDataValue('createdAt' )).format('YYYY-MM-DD HH:mm:ss' )}}, updatedAt : {type : DATE, get (return moment(this .getDataValue('updatedAt' )).format('YYYY-MM-DD HH:mm:ss' )}} }); return User; };
修改器 set() 新增数据时触发
1 2 3 4 5 6 7 8 9 10 11 12 13 14 15 16 17 18 19 20 21 22 23 24 25 'use strict' ;const moment = require ('moment' )const bcrypt = require ('bcryptjs' )module .exports = app => const { STRING, INTEGER, DATE } = app.Sequelize; const User = app.model.define('user' , { id : { type : INTEGER(20 ).UNSIGNED, primaryKey : true , autoIncrement : true }, nickname : { type : STRING}, password : { type : STRING, set (val ) const salt = bcrypt.genSaltSync(10 ) const pwd = bcrypt.hashSync(val, salt) this .setDataValue('password' ,pwd) } }, email : { type : STRING}, openid : { type : STRING} }); return User; };
静态属性 模型静态属性
1 2 3 4 5 6 7 8 9 10 11 12 13 14 15 16 17 18 19 20 21 22 23 24 25 26 27 28 29 30 'use strict' ;module .exports = app => const { STRING, INTEGER, DATE } = app.Sequelize; const Post = app.model.define('post' , { id : { type : INTEGER, primaryKey : true , autoIncrement : true , }, title : STRING(30 ), content : STRING(255 ), user_id : INTEGER, created_at : DATE, updated_at : DATE, }); Post.associate = function ( app.model.Post.belongsTo(app.model.User, { as : 'user' , foreignKey : 'user_id' }); }; Post.findByIdWithUser = async function (id, userId ) return await this .findOne({ where : { id, user_id : userId }, }); }; return Post; };
调用:
1 2 3 4 5 6 7 8 9 10 11 12 13 14 15 16 17 18 async update ({ id, user_id, updates } ) const post = await this .ctx.model.Post.findByIdWithUser(id, user_id); if (!post) this .ctx.throw(404 , 'post not found' ); return post.update(updates); } async find (id ) const post = await this .ctx.model.Post.findByPk(id, { include : [{ model : this .ctx.model.User, as : 'user' , attributes : [ 'id' , 'name' , 'age' ], }], }); if (!post) { this .ctx.throw(404 , 'post not found' ); } return post; }
字段验证 数据库字段约束
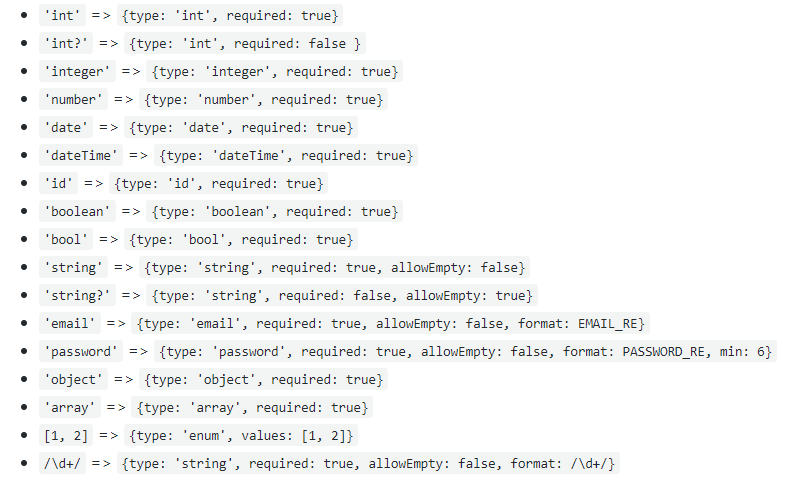
模型验证允许你为模型的每个属性指定格式/内容/继承验证.create,update和save上. 你也可以调用validate()手动验证一个实例.
1 2 3 4 5 6 7 8 9 10 11 12 13 14 15 16 17 18 19 20 21 22 23 24 25 26 27 28 29 30 31 32 33 34 35 36 37 38 39 40 41 42 43 44 45 46 47 48 49 50 51 52 53 54 55 56 57 58 59 60 61 62 63 64 65 66 67 class ValidateMe extends Model ValidateMe.init({ bar : { type : Sequelize.STRING, validate : { is : ["^[a-z]+$" ,'i' ], is : /^[a-z]+$/i , not: ["[a-z]" ,'i' ], isEmail : true , isUrl : true , isIP : true , isIPv4 : true , isIPv6 : true , isAlpha : true , isAlphanumeric : true , isNumeric : true , isInt : true , isFloat : true , isDecimal : true , isLowercase : true , isUppercase : true , notNull : true , isNull : true , notEmpty : true , equals : 'specific value' , contains : 'foo' , notIn : [['foo' , 'bar' ]], isIn : [['foo' , 'bar' ]], notContains : 'bar' , len : [2 ,10 ], isUUID : 4 , isDate : true , isAfter : "2011-11-05" , isBefore : "2011-11-05" , max : 23 , min : 23 , isCreditCard : true , isEven (value ) if (parseInt (value) % 2 !== 0 ) { throw new Error ('Only even values are allowed!' ); } } isGreaterThanOtherField (value ) if (parseInt (value) <= parseInt (this .otherField)) { throw new Error ('Bar must be greater than otherField.' ); } } } } }, { sequelize }); const Student = app.model.define('student' ,{ id : { type : INTEGER, primaryKey : true , autoIncrement : true }, name : { type : STRING, allowNull : false }, age : { type : INTEGER, allowNull : false , validate : { isEmail : { args : true , msg : '不是邮箱类型' } } },
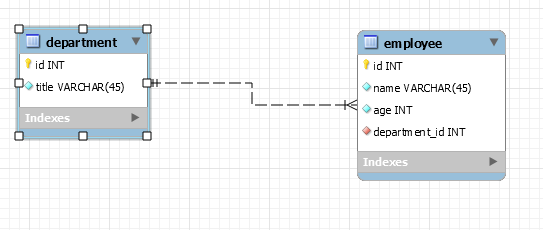
外键约束 主表:部门表
CASCADE
关联模型 一对一 满足条件:一个人只能对应一个身份证,一个身份证只能对应一个人
一对一可以在任意一个表添加外键
反向关联
1 2 3 4 5 6 7 8 9 10 11 12 13 14 15 16 17 18 19 20 21 22 23 24 25 26 27 28 29 30 31 32 33 34 35 36 37 38 'use strict' ;const moment = require ('moment' );module .exports = app => const { STRING, INTEGER, DATE } = app.Sequelize; const Flow = app.model.define('flow' , { id : { type : INTEGER.UNSIGNED, primaryKey : true , autoIncrement : true }, status : { type : INTEGER}, index : { type : INTEGER }, type : { type : INTEGER }, art_id : { type : INTEGER } }); Flow.associate = function ( app.model.Flow.belongsTo(app.model.Movie, { as : 'movie' , foreignKey : 'art_id' , targetKey : 'id' }); } Flow.getNewFlowByIndex = async function ( const flow = await this .findOne({ attributes : ['index' ], include : [{ model : app.model.Movie, as : 'movie' , attributes : ['image' , 'content' , 'title' ] }], order : [ ['index' , 'DESC' ] ] }); return flow ? flow.dataValues : false ; } return Flow;
一对多 描述:
示例:
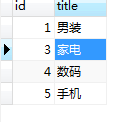
分类表:
model 里面建2张模型,分别是category.js goods.js
catrgory.js 模型代码:
1 2 3 4 5 6 7 8 9 10 11 12 13 14 15 16 17 module .exports = app => const {Sequelize} = app const {STRING,INTEGER} = Sequelize const Category = app.model.define('category' , { id : { type : INTEGER, primaryKey : true , autoIncrement : true }, title : { type : STRING } }, { timestamps : false , paranoid : false }); Category.associate = function ( app.model.Category.hasMany(app.model.Goods, { as : 'goods' , foreignKey : 'cate_id' , targetKey : 'id' }); }; return Category; }
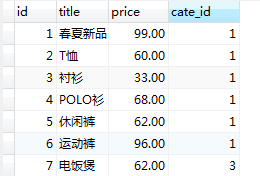
goods.js 模型代码:
1 2 3 4 5 6 7 8 9 10 11 12 13 14 15 16 17 18 module .exports = app => const {Sequelize} = app const {STRING,INTEGER} = Sequelize const Goods = app.model.define('goods' , { id : { type : INTEGER, primaryKey : true , autoIncrement : true }, title : { type : STRING }, price : {type : INTEGER}, cate_id : {type : INTEGER} }, { timestamps : false , paranoid : false }); Goods.associate = function ( app.model.Goods.belongsTo(app.model.Category, { as : 'cate' , foreignKey : 'cate_id' , targetKey : 'id' }); }; return Goods; }
controller 查询
1 2 3 4 5 6 7 8 9 10 11 12 13 14 15 16 17 18 19 20 21 22 23 const {Op} = this .app.Sequelize;const {Sequelize} = this .app;const cate = await this .ctx.model.Category.findAll({ include : [{ model : this .ctx.model.Goods, as : 'goods' , attributes :[[Sequelize.fn('COUNT' , Sequelize.col('*' )), 'total_goods' ]] }], attributes : ['title' ], group : 'title' , distinct : true }); const goods = await this .ctx.model.Goods.findAll({ include : [{ model : this .ctx.model.Category, as : 'cate' }], distinct : true })
左外连接 LEFT OUTER JOIN 左外连接
需求:查询所有分类,如果该分类下没有商品,则不显示该分类
实现:
1 2 3 4 5 6 7 8 9 10 11 12 13 14 15 16 17 18 19 20 21 22 23 24 25 SELECT `goods` .`id` , `goods` .`title` , `goods` .`price` , `goods` .`cate_id` , `cate` .`id` , `cate` , `cate.title` FROM `goods` LEFT OUTER JOIN `category` AS `cate` ON `goods` .`cate_id` = `cate` .`id` ; const cate = await this .ctx.model.Category.findAll({ include : [{ model : this .ctx.model.Goods, as : 'goods' , attributes :['title' , 'price' ], required : true , }], distinct : true });
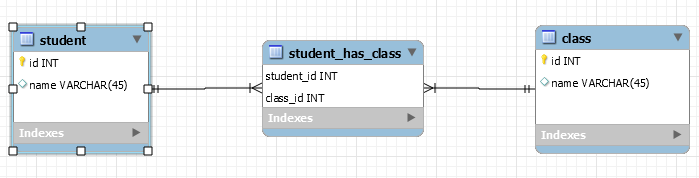
多对多 多对多关联模型
满足条件:一个学生可以选择多个课程,一个课程也可以被多个学生选择
多对多,需要借助第三个中间表,中间表包含了2个外键,分别是两个表的主键
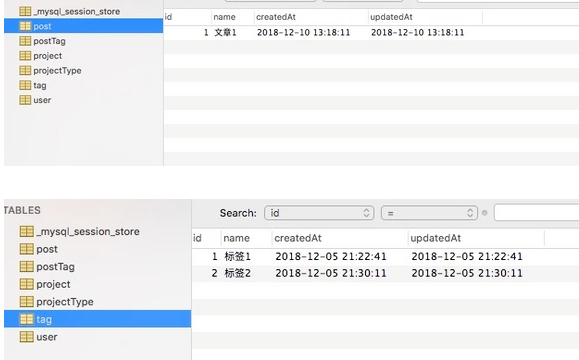
我们假设有这样的一个场景,文章(Post)可以有多个标签(Tag),同样,一个Tag也可以对应多个Post,我们需要一张关联表PostTag来记录Post和Tag之间的关系。
一、model 建立3张模型表
二、建立表关系 1 2 3 4 5 6 7 8 9 10 11 12 13 14 15 16 17 18 19 文章表 Post.belongsToMany(Tag, { through: { model: PostTag, unique: false, }, foreignKey: 'postId', //通过外键postId constraints: false }); 标签表 Tag.belongsToMany(Post, { through: { model: PostTag, unique: false, }, foreignKey: 'tagId', //通过外键tagId constraints: false });
建议关联关系之后,Post会自动添加addTags、getTags、setTags方法。
三、添加 1 2 3 4 5 6 7 8 9 10 11 static async create(data) { //例如我们tag表有2条数据,[{id:1,name:'标签1'},{id:2,name:'标签2'}] //传递进来的data = {name:'文章1',tagIds:[1,2]} let newPost = await Post.create({name: data.name}); //返回创建的post对象 let tags = await Tag.findAll({where: {id: data['tagIds']}})//找到对应的tagId对象 await newPost.setTags(tags) //通过setTags方法在postTag表添加记录 return true //以上操作会给post表创建一条新的记录,{id:1,name:'文章1'} //给postTag表添加2条记录,[{id:1,postId:1,tagId:1},{id:2,post:1,tagId:2}] }
四、关联查询 1 2 3 4 5 6 7 8 9 10 11 12 13 14 15 16 17 18 19 20 21 22 23 24 25 26 27 28 29 30 31 32 33 34 35 36 37 38 39 40 41 42 43 44 45 46 47 48 static async allPost ( return await Post.findAll({ include : [ {model : Tag, attributes : ['id' , 'name' ]} ] }); } { "code" : 200 ,"msg" : "查询成功!" ,"data" : [ { "createdAt" : "2018-12-10 13:18:11" , "updatedAt" : "2018-12-10 13:18:11" , "id" : 1 , "name" : "文章1" , "tags" : [ { "createdAt" : "2018-12-10 13:21:37" , "updatedAt" : "2018-12-10 13:21:37" , "id" : 1 , "name" : "标签1" , "postTag" : { "createdAt" : "2018-12-10 13:18:11" , "updatedAt" : "2018-12-10 13:18:11" , "id" : 1 , "postId" : 1 , "tagId" : 1 } }, { "createdAt" : "2018-12-10 13:21:37" , "updatedAt" : "2018-12-10 13:21:37" , "id" : 2 , "name" : "标签2" , "postTag" : { "createdAt" : "2018-12-10 13:18:11" , "updatedAt" : "2018-12-10 13:18:11" , "id" : 2 , "postId" : 1 , "tagId" : 2 } } ] } ]
五、更新 1 2 3 4 5 6 7 8 9 static async updatePost (id, data ) let tags = await Tag.findAll({where : {id : data['tagIds' ]}}) Post.findByPk(id).then(function (post ) post.update({name : data.name}) post.setTags(tags) }) return true }
六、事务 多表更新中,我们总担心那一步出错,导致后期难以维护,这里可以使用transaction事务来处理。一旦那一步出错,自动回滚。我拿创建那一步写个范例。
1 2 3 4 5 6 7 8 9 10 11 12 13 14 15 16 17 static async create (data ) let tags = await Tag.findAll({where : {id : data['tagIds' ]}}) return Sequelize.transaction(function (t ) return Post.create({name : data.name}, {transaction : t}) .then(function (post ) return post.setTags(tags, {transaction : t}) }); }).then(function (result ) }).catch(function (err ) throw err; }); }
字段显示隐藏 排除不显示字段
1 2 3 Model.findAll({ attributes : { exclude : ['baz' ] } });
事务 Egg.js中使用sequelize事务
对数据库的操作很多时候需要同时进行几个操作,比如需要同时改动几张表的数据,或者对同一张表中不同行(row)或列(column)做不同操作,比较典型的例子就是用户转账问题(A账户向B账号汇钱):官方文档 ,使用方法如下:
1 2 3 4 5 6 7 8 9 10 11 12 13 14 let transaction;try { transaction = await this .ctx.model.transaction(); await this .service.xxx.xxx(parms, transaction); await this .service.xxx.xxx(parms1, parms2, transaction); await transaction.commit(); return true } catch (e) { await transaction.rollback(); return false }
字段自增 字段自增
1 2 const flow = await this .ctx.model.Flow.findOne({ where : { art_id } });await flow.increment('index' , { by : 900 });
字段自减
1 2 const flow = await this .ctx.model.Flow.findOne({ where : { art_id } });await flow.decrement('index' , { by : 900 });
请求数据验证 egg-validate egg-validate的定制化升级
定制化egg-validate
建立 app.js 入口文件
1 2 3 4 5 6 7 8 9 10 11 12 13 14 15 16 17 'use strict' const path = require ('path' )class AppBootHook constructor (app ) this .app = app; } async didLoad ( const directory = path.join(this .app.config.baseDir, 'app/validate' ); app.loader.loadToApp(directory, 'validate' ); } } module .exports = AppBootHook;
建立自定义规则校验文件
1 2 3 4 5 6 7 8 9 10 11 12 13 14 15 16 17 18 19 20 21 22 module .exports = app => let { validator } = app; validator.addRule('userName' , (rule, value )=> { console .log(rule); if (/^\d+$/ .test(value)) { return "用户名应该是字符串" ; } else if (value.length < 3 || value.length > 10 ) { console .log("用户名的长度应该在3-10之间" ); } }); validator.addRule('123' , (rule, value ) => { if (value !== '123' ){ return 'must be 123' ; } }); };
参数校验
1 ctx.validate({username :{type :'userName' }}, ctx.request.body )
indicative验证器 indicative 验证器
egg-validate-plus egg-validate-plus 使用
文档:https://github.com/temool/egg-validate-plus rules中规则的编写,参见async-validator 中验证规则的编写
开启插件
1 2 3 4 5 // config/plugin.{env}.js exports.validatePlus = { enable: true, package: 'egg-validate-plus', };
配置插件
1 2 3 4 5 6 7 8 9 10 11 12 13 14 // config/config.{env}.js config.validatePlus = { resolveError(ctx, errors) { if (errors.length) { ctx.type = 'json'; ctx.status = 400; ctx.body = { code: 400, error: errors, message: '参数错误', }; } } };
使用插件
1 2 3 4 5 6 7 8 9 10 11 12 13 14 15 |- MY-PROJECT |- app |- controller |- user.js |- post.js |- rules |- user |- login.js [用户登录参数校验规则] |- post |- add.js [创建 post 参数校验规则] |- config |- config.default.js |- plugin.js |- package.json |- README.md
规则的传入方式
1.传入字符串
1 2 3 4 5 6 7 const { query } = this .ctx.request;const validateResult = await this .ctx.validate('user.login' , query)if (!validateResult) return
注意:不要带上 rules
2.直接传入验证规则对象
1 2 3 4 5 6 7 8 9 10 11 12 13 14 15 16 17 18 19 20 21 22 23 24 25 26 27 const rule = this .app.rules.user.loginconst { query } = this .ctx.request;const validateResult = await this .ctx.validate(rule, query)if (!validateResult) return
添加signIn.js规则
1 2 3 4 5 6 7 8 9 10 11 12 13 14 15 16 17 18 19 20 21 22 23 24 25 'use strict' ;const rule = { email : [ { required : true , message : '邮箱不能为空' }, { type : 'email' , message : '邮箱格式不正确' }, ], password : [ { required : true , message : '密码不能为空' }, { type : 'string' , message : '密码字段需要是字符串' }, { validator (rule, value, callback, source, options ) const pattern = /^(?=.*[a-z])(?=.*[A-Z])(?=.*\d)[^]{8,16}$/ ; if (pattern.test(value)) { callback(); return ; } callback({ message : '密码最少包含一个大小写字母、数字并且为8-16位' }); }, }, ], }; module .exports = rule;
controller中login.js使用
1 2 3 4 5 6 7 8 9 10 11 12 13 14 15 16 17 18 19 20 21 'use strict' ;const Controller = require ('egg' ).Controller;class LoginController extends Controller async loginIn ( const { ctx, app } = this ; const { email, password } = ctx.request.body; const validateResult = await ctx.validate('login.signIn' , { email, password }); if (!validateResult) { return ; } const loginInfo = await ctx.service.user.login({ password, email }); ctx.returnBody(200 , '登录成功' , loginInfo.userId); } } module .exports = LoginController;
context.js扩展
1 2 3 4 5 6 7 8 9 10 11 12 'use strict' ;module .exports = { returnBody (status, message, data = null ) this .status = status; this .body = { message, data, flag : true , }; }, };
betterValidate egg 中使用 BetterValidate
BetterValidate 依赖于 validator 插件
文档:https://www.npmjs.com/package/validator
app.js 构建 validate 目录 并且挂载到ctx
1 2 3 4 5 6 7 8 9 10 11 12 13 const path = require ('path' );async didLoad ( const { HttpExceptions } = require ('./app/exceptions/http_exceptions' ) global .myErrors = HttpExceptions; const validatorsPaths = this .app.loader.getLoadUnits().map(unit =>'app/validators' )); this .app.loader.loadToContext(validatorsPaths, 'validators' , { call : true , fieldClass : 'validatorsClasses' , }); }
建立 2个 BetterValidate 核心类库
1 2 3 4 5 6 7 8 9 10 11 12 13 14 15 16 17 18 19 20 21 22 23 24 25 26 27 28 29 30 31 32 33 34 35 36 37 38 39 40 41 const findMembers = function (instance, { prefix, specifiedType, filter } ) function _find (instance ) if (instance.__proto__ === null ) return [] let names = Reflect .ownKeys(instance) names = names.filter((name ) => { return _shouldKeep(name) }) return [...names, ..._find(instance.__proto__)] } function _shouldKeep (value ) if (filter) { if (filter(value)) { return true } } if (prefix) if (value.startsWith(prefix)) return true if (specifiedType) if (instance[value] instanceof specifiedType) return true } return _find(instance) } module .exports = { findMembers }
app / cores / valitators.js
1 2 3 4 5 6 7 8 9 10 11 12 13 14 15 16 17 18 19 20 21 22 23 24 25 26 27 28 29 30 31 32 33 34 35 36 37 38 39 40 41 42 43 44 45 46 47 48 49 50 51 52 53 54 55 56 57 58 59 60 61 62 63 64 65 66 67 68 69 70 71 72 73 74 75 76 77 78 79 80 81 82 83 84 85 86 87 88 89 90 91 92 93 94 95 96 97 98 99 100 101 102 103 104 105 106 107 108 109 110 111 112 113 114 115 116 117 118 119 120 121 122 123 124 125 126 127 128 129 130 131 132 133 134 135 136 137 138 139 140 141 142 143 144 145 146 147 148 149 150 151 152 153 154 155 156 157 158 159 160 161 162 163 164 165 166 167 168 169 170 171 172 173 174 175 176 177 178 179 180 181 182 183 184 185 186 187 188 189 190 191 192 193 194 195 196 197 198 199 200 201 202 203 204 205 206 207 208 209 210 211 212 213 214 215 216 217 218 219 220 221 222 223 224 225 226 227 228 229 230 231 232 233 234 235 236 237 238 239 240 241 242 243 244 245 246 247 248 249 250 251 252 253 254 255 256 257 258 259 260 261 262 263 264 265 266 267 268 269 270 271 272 const validator = require ('validator' )const { HttpExceptions } = require ('../exceptions/http_exceptions' ) const { get, last, set, cloneDeep } = require ("lodash" ) const { findMembers } = require ('./utils' ) class BetterValidate constructor ( this .data = {} this .parsed = {} } _assembleAllParams (ctx ) return { body : ctx.request.body, query : ctx.request.query, path : ctx.params, header : ctx.request.header } } get (path, parsed = true ) if (parsed) { const value = get(this .parsed, path, null ) if (value == null ) { const keys = path.split('.' ) const key = last(keys) return get(this .parsed.default, key) } return value } else { return get(this .data, path) } } _findMembersFilter (key ) if (/validate([A-Z])\w+/g .test(key)) { return true } if (this [key] instanceof Array ) { this [key].forEach(value => const isRuleType = value instanceof Rule if (!isRuleType) { throw new Error ('验证数组必须全部为Rule类型' ) } }) return true } return false } async validate (ctx, alias = {} ) this .alias = alias let params = this ._assembleAllParams(ctx) this .data = cloneDeep(params) this .parsed = cloneDeep(params) const memberKeys = findMembers(this , { filter : this ._findMembersFilter.bind(this ) }) const errorMsgs = [] for (let key of memberKeys) { const result = await this ._check(key, alias) if (!result.success) { errorMsgs.push(result.msg) } } if (errorMsgs.length != 0 ) { throw new HttpExceptions(errorMsgs) } ctx.v = this return this } async _check (key, alias = {} ) const isCustomFunc = typeof (this [key]) == 'function' ? true : false let result; if (isCustomFunc) { try { await this [key](this .data) result = new RuleResult(true ) } catch (error) { result = new RuleResult(false , error.msg || error.message || '参数错误' ) } } else { const rules = this [key] const ruleField = new RuleField(rules) key = alias[key] ? alias[key] : key const param = this ._findParam(key) result = ruleField.validate(param.value) if (result.pass) { if (param.path.length == 0 ) { set(this .parsed, ['default' , key], result.legalValue) } else { set(this .parsed, param.path, result.legalValue) } } } if (!result.pass) { const msg = `${isCustomFunc ? '' : key} ${result.msg} ` return { msg : msg, success : false } } return { msg : 'ok' , success : true } } _findParam (key ) let value value = get(this .data, ['query' , key]) if (value) { return { value, path : ['query' , key] } } value = get(this .data, ['body' , key]) if (value) { return { value, path : ['body' , key] } } value = get(this .data, ['path' , key]) if (value) { return { value, path : ['path' , key] } } value = get(this .data, ['header' , key]) if (value) { return { value, path : ['header' , key] } } return { value : null , path : [] } } } class RuleResult constructor (pass, msg = '' ) Object .assign(this , { pass, msg }) } } class RuleFieldResult extends RuleResult constructor (pass, msg = '' , legalValue = null ) super (pass, msg) this .legalValue = legalValue } } class Rule constructor (name, msg, ...params ) Object .assign(this , { name, msg, params }) } validate (field ) if (this .name == 'isOptional' ) return new RuleResult(true ) if (!validator[this .name](field + '' , ...this.params)) { return new RuleResult(false , this .msg || this .message || '参数错误' ) } return new RuleResult(true , '' ) } } class RuleField constructor (rules ) this .rules = rules } validate (field ) if (field == null ) { const allowEmpty = this ._allowEmpty() const defaultValue = this ._hasDefault() if (allowEmpty) { return new RuleFieldResult(true , '' , defaultValue) } else { return new RuleFieldResult(false , '字段是必填参数' ) } } const filedResult = new RuleFieldResult(false ) for (let rule of this .rules) { let result = rule.validate(field) if (!result.pass) { filedResult.msg = result.msg filedResult.legalValue = null return filedResult } } return new RuleFieldResult(true , '' , this ._convert(field)) } _convert (value ) for (let rule of this .rules) { if (rule.name == 'isInt' ) { return parseInt (value) } if (rule.name == 'isFloat' ) { return parseFloat (value) } if (rule.name == 'isBoolean' ) { return value ? true : false } } return value } _allowEmpty ( for (let rule of this .rules) { if (rule.name == 'isOptional' ) { return true } } return false } _hasDefault ( for (let rule of this .rules) { const defaultValue = rule.params[0 ] if (rule.name == 'isOptional' ) { return defaultValue } } } } module .exports = { Rule, BetterValidate }
使用BetterValidate 进行参数验证
1 2 3 4 5 6 7 8 9 10 11 12 13 14 15 16 17 18 19 20 21 22 23 24 25 26 27 28 29 30 31 32 33 34 35 36 37 38 39 40 41 42 43 44 45 const { BetterValidate, Rule } = require ('../../cores/valitators' ); class Register extends BetterValidate constructor ( super () this .email = [ new Rule('isEmail' , '不符合Email规范' ) ], this .password = [ new Rule('isLength' , '密码至少6个字符,最多32个字符' , { min : 6 , max : 32 }), new Rule('matches' , '密码必须是字母和数字组合' , '^(?![0-9]+$)(?![a-zA-Z]+$)[0-9a-zA-Z]' ) ], this .passwordConfirm = this .password, this .nickname = [ new Rule('isLength' , '昵称最少2个字符,最大6个字符' , {min :2 ,max :30 }) ] } validatePassword (value ) const pwd = value.body.password; const pwdConfirm = value.body.passwordConfirm; if (!Object .is(pwd,pwdConfirm)) { throw new Error ('两次密码输入不一致!' ) } } } module .exports = Register;
更多验证规则
1 2 3 4 5 6 7 8 9 10 11 12 13 14 15 16 17 18 19 20 21 22 23 24 25 26 27 28 29 30 31 32 33 34 35 36 37 38 39 40 41 42 43 44 45 46 47 48 49 50 51 52 53 54 55 56 const { BetterValidate, Rule } = require ('../../cores/valitators' ); class Login extends BetterValidate constructor ( super () this .account = [ new Rule('isLength' , '账号最少4位,不能超过32位' , { min : 4 , max : 32 }) ], this .secret = [ new Rule('isOptional' ), new Rule('isLength' , '至少6个字符' , { min : 6 , max : 128 }) ] } validateType (value ) const type = value.body.type; if (!type) throw new Error ('type 不能为空!' ); if (!this ._checkTypes(type)) throw new Error ('type类型必须为 100 101 102 200' ); } _checkTypes (type ) const allowed = { USER_MINI_PROGRAM : 100 , USER_EMAIL : 101 , USER_MOBILE : 102 , ADMIN_EMAIL : 200 , WEIXIN_LOGIN :300 } for (let [key, val] of Object .entries(allowed)) { if ( val === Number (type) ) { return true ; } } return false ; } } module .exports = Login;
控制器进行参数验证
1 2 3 4 5 6 7 8 9 10 const v = await new RegisterValidator().validate(ctx); const nickname = v.get("body.nickname" ); await userDao.createUser(ctx, v); ctx.json( new Success({ msg : "用户创建成功" }) );
BetterValidate 校验规则 类校验
对于参数的校验,Lin 提供了类校验这种便捷,好用的方式,它会 对ctx.request.body(上下文请求体)、ctx.request.query(上下文请求query参数)、ctx.request.header(上下文请求头)、ctx.param(路由参数)这些参数进行统一校验 ,所以请保证你的参数名没有重复 。
代码演示:
1 2 3 4 5 6 7 8 9 10 11 12 13 14 15 16 17 18 19 20 21 22 23 24 25 26 27 28 29 30 31 32 33 34 35 36 37 38 class RegisterValidator extends LinValidator constructor ( super (); this .nickname = [ new Rule("isNotEmpty" , "昵称不可为空" ), new Rule("isLength" , "昵称长度必须在2~10之间" , 2 , 10 ) new Rule("isInt" , "分组id必须是整数,且大于0" , { min : 1 }) ]; this .group_id = new Rule("isInt" , "分组id必须是整数,且大于0" , { min : 1 }); this .email = [ new Rule("isOptional" ), new Rule("isEmail" , "电子邮箱不符合规范,请输入正确的邮箱" ) ]; this .password = [ new Rule( "matches" , "密码长度必须在6~22位之间,包含字符、数字和 _ " , /^[A-Za-z0-9_*&$#@]{6,22}$/ ) ]; this .confirm_password = new Rule("isNotEmpty" , "确认密码不可为空" ); } validateConfirmPassword (data ) if (!data.body.password || !data.body.confirm_password) { return [false , "两次输入的密码不一致,请重新输入" ]; } let ok = data.body.password === data.body.confirm_password; if (ok) { return ok; } else { return [false , "两次输入的密码不一致,请重新输入" ]; } } }
isOptional
isOptional这个 Rule 校验, 当字段存在时,则校验,不存在则不校验
1 new Rule("isOptional" , "" , "pedrogao1996@gmail.com" ),
当isOptionalRule 被赋有默认值时,这个字段就会发生变化。以email为例,当前端没 有传入这个参数时,校验器中的email数据肯定是一个undefined。但是因为默认值的存 在,这个email会被赋予默认值,即pedrogao1996@gmail.com
自定义规则函数
规则函数是校验器中另一种用于对参数校验的方式,它比显示的 Rule 校验具有更加的灵活 性和可操作性。下面我们以一个小例子来深入理解规则函数:
1 2 3 4 5 6 7 8 9 10 11 validateConfirmPassword (data ) if (!data.body.password || !data.body.confirm_password) { return [false , "两次输入的密码不一致,请重新输入" ]; } let ok = data.body.password === data.body.confirm_password; if (ok) { return ok; } else { return [false , "两次输入的密码不一致,请重新输入" ]; } }
首先任何一个规则函数,满足以validate开头的类方法,除validate()这个函数外。都 会被带入一个重要的参数data。data 是前端传入参数的容器,它的整体结构如下:
1 2 3 4 5 6 this .data = { body : ctx.request.body, query : ctx.request.query, path : ctx.params, header : ctx.request.header };
返回值的所有可选项类似如下:
1 2 3 4 5 6 7 8 9 validateNameAndAge ( return true ; return [false ,"message" ] return [false ,"message" ,"nameAndAge" ] }
规则函数除了通过返回值来判断失败之外,还可以通过抛出异常来提前结束规则函数并校验 失败。如下:
1 2 3 4 5 6 validateNameAndAge ( throw new ParametersException({ msg : "Lin will carry you!" }); return true ; }
这两种方式都可以使规则函数校验失败,但是我们推荐你使用第一种方式,即返回值方式
继承
校验器提供继承的方式,让你的参数可以被组合校验。
1 2 3 4 5 6 class PositiveIdValidator extends LinValidator constructor ( super (); this .id = new Rule("isInt" , "id必须为正整数" , { min : 1 }); } }
我们首先定义了一个PositiveIdValidator的校验器,它会被 id 这个参数进行正整数校 验,一般情况下 id 的校验被使用的很普遍,其他的校验器也需要使用,但是我们又不想重 新再写一遍。因此,我们可以继承PositiveIdValidator。
1 2 3 4 5 6 7 8 9 class UpdateUserInfoValidator extends PositiveIdValidator constructor ( super (); this .group_id = new Rule("isInt" , "分组id必须是正整数" , { min : 1 }); this .email = new Rule("isEmail" , "电子邮箱不符合规范,请输入正确的邮箱" ); } }
这里UpdateUserInfoValidator继承了PositiveIdValidator,因 此UpdateUserInfoValidator也可对 id 参数进行校验,而且扩展了 group_id 和 email 两个参数的校验。
别名
validator 不仅仅提供继承,还提供另一种解放劳动力的方式——别名。如:
1 2 3 4 5 6 class PositiveIdValidator extends LinValidator constructor ( super (); this .id = new Rule("isInt" , "id必须为正整数" , { min : 1 }); } }
PositiveIdValidator会对 id 参数进行校验,但是有时候参数的校验逻辑是一样的,但 是参数的名字不相同。如 uid 这个参数,它跟 id 这个参数的 Rule 一样。那么我们是不 是还需要重新再写一个校验器定义一个 uid 的 Rule 了。这可行,但不优雅。
1 const v = await new PositiveIdValidator().validate(ctx, { id : "uid" });
我们可以通过上面的方式来给 id 一个别名,这个别名为 uid。当使用了别名之后,校验器 不会对 id 这个参数做校验,但是会对 uid 这个参数做校验 。
中间件 中间件(Middleware)
Egg 是基于 Koa 实现的,所以 Egg 的中间件形式和 Koa 的中间件形式是一样的,都是基于洋葱圈模型 。每次我们编写一个中间件,就相当于在洋葱外面包了一层。
编写中间件 写法
我们先来通过编写一个简单的 gzip 中间件,来看看中间件的写法。
1 2 3 4 5 6 7 8 9 10 11 12 13 14 15 16 17 18 const isJSON = require ('koa-is-json' );const zlib = require ('zlib' );async function gzip (ctx, next ) await next(); let body = ctx.body; if (!body) return ; if (isJSON(body)) body = JSON .stringify(body); const stream = zlib.createGzip(); stream.end(body); ctx.body = stream; ctx.set('Content-Encoding' , 'gzip' ); }
可以看到,框架的中间件和 Koa 的中间件写法是一模一样的,所以任何 Koa 的中间件都可以直接被框架使用。
配置 一般来说中间件也会有自己的配置。在框架中,一个完整的中间件是包含了配置处理的。我们约定一个中间件是一个放置在 app/middleware 目录下的单独文件,它需要 exports 一个普通的 function,接受两个参数:
options: 中间件的配置项,框架会将 app.config[${middlewareName}] 传递进来。
app: 当前应用 Application 的实例。
我们将上面的 gzip 中间件做一个简单的优化,让它支持指定只有当 body 大于配置的 threshold 时才进行 gzip 压缩,我们要在 app/middleware 目录下新建一个文件 gzip.js
1 2 3 4 5 6 7 8 9 10 11 12 13 14 15 16 17 18 19 20 21 22 23 24 const isJSON = require ('koa-is-json' );const zlib = require ('zlib' );module .exports = options => return async function gzip (ctx, next ) await next(); let body = ctx.body; if (!body) return ; if (options.threshold && ctx.length < options.threshold) return ; if (isJSON(body)) body = JSON .stringify(body); const stream = zlib.createGzip(); stream.end(body); ctx.body = stream; ctx.set('Content-Encoding' , 'gzip' ); }; };
使用中间件 中间件编写完成后,我们还需要手动挂载,支持以下方式:
在应用中使用中间件 在应用中,我们可以完全通过配置来加载自定义的中间件,并决定它们的顺序。
如果我们需要加载上面的 gzip 中间件,在 config.default.js 中加入下面的配置就完成了中间件的开启和配置:
1 2 3 4 5 6 7 8 9 module .exports = { middleware : [ 'gzip' ], gzip : { threshold : 1024 , }, };
该配置最终将在启动时合并到 app.config.appMiddleware。
在框架和插件中使用中间件 框架和插件不支持在 config.default.js 中匹配 middleware,需要通过以下方式:
1 2 3 4 5 6 7 8 9 10 11 12 13 14 15 module .exports = app => app.config.coreMiddleware.unshift('report' ); }; module .exports = () => { return async function (ctx, next ) const startTime = Date .now(); await next(); reportTime(Date .now() - startTime); } };
应用层定义的中间件(app.config.appMiddleware)和框架默认中间件(app.config.coreMiddleware)都会被加载器加载,并挂载到 app.middleware 上。
router 中使用中间件 以上两种方式配置的中间件是全局的,会处理每一次请求。 如果你只想针对单个路由生效,可以直接在 app/router.js 中实例化和挂载,如下:
1 2 3 4 module .exports = app => const gzip = app.middleware.gzip({ threshold : 1024 }); app.router.get('/needgzip' , gzip, app.controller.handler); };
框架默认中间件 除了应用层加载中间件之外,框架自身和其他的插件也会加载许多中间件。所有的这些自带中间件的配置项都通过在配置中修改中间件同名配置项进行修改,例如框架自带的中间件 中有一个 bodyParser 中间件(框架的加载器会将文件名中的各种分隔符都修改成驼峰形式的变量名),我们想要修改 bodyParser 的配置,只需要在 config/config.default.js 中编写
1 2 3 4 5 module .exports = { bodyParser : { jsonLimit : '10mb' , }, };
注意:框架和插件加载的中间件会在应用层配置的中间件之前,框架默认中间件不能被应用层中间件覆盖,如果应用层有自定义同名中间件,在启动时会报错。
使用 Koa 的中间件 在框架里面可以非常容易的引入 Koa 中间件生态。
以 koa-compress 为例,在 Koa 中使用时:
1 2 3 4 5 6 7 const koa = require ('koa' );const compress = require ('koa-compress' );const app = koa();const options = { threshold : 2048 };app.use(compress(options));
我们按照框架的规范来在应用中加载这个 Koa 的中间件:
1 2 3 4 5 6 7 8 9 10 module .exports = require ('koa-compress' );module .exports = { middleware : [ 'compress' ], compress : { threshold : 2048 , }, };
如果使用到的 Koa 中间件不符合入参规范,则可以自行处理下:
1 2 3 4 5 6 7 8 9 10 11 12 13 14 module .exports = { webpack : { compiler : {}, others : {}, }, }; const webpackMiddleware = require ('some-koa-middleware' );module .exports = (options, app ) => { return webpackMiddleware(options.compiler, options.others); }
通用配置 无论是应用层加载的中间件还是框架自带中间件,都支持几个通用的配置项:
enable:控制中间件是否开启。
match:设置只有符合某些规则的请求才会经过这个中间件。
ignore:设置符合某些规则的请求不经过这个中间件。
enable 如果我们的应用并不需要默认的 bodyParser 中间件来进行请求体的解析,此时我们可以通过配置 enable 为 false 来关闭它
1 2 3 4 5 module .exports = { bodyParser : { enable : false , }, };
match 和 ignore match 和 ignore 支持的参数都一样,只是作用完全相反,match 和 ignore 不允许同时配置。
如果我们想让 gzip 只针对 /static 前缀开头的 url 请求开启,我们可以配置 match 选项
1 2 3 4 5 module.exports = { gzip: { match: '/static', }, };
match 和 ignore 支持多种类型的配置方式
字符串:当参数为字符串类型时,配置的是一个 url 的路径前缀,所有以配置的字符串作为前缀的 url 都会匹配上。 当然,你也可以直接使用字符串数组。
正则:当参数为正则时,直接匹配满足正则验证的 url 的路径。
函数:当参数为一个函数时,会将请求上下文传递给这个函数,最终取函数返回的结果(true/false)来判断是否匹配。
1 2 3 4 5 6 7 8 9 module .exports = { gzip : { match (ctx ) const reg = /iphone|ipad|ipod/i ; return reg.test(ctx.get('user-agent' )); }, }, };
有关更多的 match 和 ignore 配置情况,详见 egg-path-matching .
安全 数据加密 bcrypt 数据加密
文档:https://www.npmjs.com/package/bcryptjs
封装helper函数 app / extend / helper.js
1 2 3 4 5 6 7 8 9 10 11 12 13 14 15 16 17 18 19 20 21 22 23 24 25 26 27 28 29 30 31 32 33 const bcrypt = require ('bcryptjs' )const jwt = require ('jsonwebtoken' )module .exports = { bcryptData (password ) const salt = bcrypt.genSaltSync(10 ) return bcrypt.hashSync(password, salt) }, async comparePwd (password, user_password ) return await bcrypt.compare(password, user_password) }, generateToken (data ) return jwt.sign({ data }, this .config.token.key, { expiresIn : this .config.token.expiresIn }); } }
控制器中使用ctx.body = ctx.helper.bcryptData('123456')
单向加密 crypto 加密实例代码 1 2 3 4 5 6 7 8 9 10 11 12 13 14 15 16 17 18 19 20 21 22 23 24 25 26 27 28 29 30 31 32 33 34 35 36 37 38 39 40 41 42 43 44 45 46 47 48 49 50 51 52 53 54 55 56 57 58 59 60 61 62 63 64 65 66 67 68 69 70 71 72 73 74 75 76 77 78 79 "use strict" ;const crypto = require ("crypto" );const hash = crypto.createHash("md5" );hash.update("hello, world!" ); console .log(hash.digest("hex" ));const sha1 = crypto.createHash("sha1" );sha1.update("hello,world!" ); console .log(sha1.digest("hex" ));const sha256 = crypto.createHash("sha256" );sha256.update("hello,world!" ); console .log(sha256.digest("hex" ));const sha512 = crypto.createHash("sha512" );sha512.update("hello,world!" ); console .log(sha512.digest("hex" ));const hmac = crypto.createHash("sha256" ,"secret-key" );hmac.update("hello world!" ); console .log(hmac.digest("hex" ));function aesEncrypt (data, key ) const cipher = crypto.createCipher("aes192" , key); var crypted = cipher.update(data, "utf8" , "hex" ); crypted += cipher.final("hex" ); return crypted; } function aesDecrypt (encrypted, key ) const decipher = crypto.createDecipher("aes192" , key); var decrypted = decipher.update(encrypted, "hex" , "utf8" ); decrypted += decipher.final("utf8" ); return decrypted; } var data = "hello this a secret message!" ;var key = "password" ;var encrypted = aesEncrypt(data,key);var decrypted = aesDecrypt(encrypted, key); console .log("plain text:" + data);console .log("Encrypted text:" +encrypted);console .log(("Decrypted text:" + decrypted));var ming = crypto.createDiffieHellman(512 );var ming_keys = ming.generateKeys();var prime = ming.getPrime();var generator = ming.getGenerator();console .log("Prime:" + prime.toString("hex" ));console .log("Generator:" + generator.toString("hex" ) ); var hong = crypto.createDiffieHellman(prime, generator);var hong_keys = hong.generateKeys(); var ming_secret = ming.computeSecret(hong_keys);var hong_secret = hong.computeSecret(ming_keys); console .log("Secret of xiao ming:" + ming_secret.toString("hex" ));console .log("Secret of xiao hong:" + hong_secret.toString("hex" ));const fs = require ("fs" );function loadKey (file ) return fs.readFileSync(file,"utf8" ); }; let prvKey = loadKey("./rsa-prv.pem" );let pubKey = loadKey("./rsa-pub.pem" );let message = "hello world!" ;let enc_by_prv = crypto.privateEncrypt(prvKey,Buffer.from(message,"utf8" ));console .log("encrypted by private key:" + enc_by_prv.toString("hex" ));let dec_by_pub = crypto.publicDecrypt(pubKey, enc_by_prv);console .log("decrypted by public key:" + dec_by_pub.toString("utf8" ));let enc_by_pub = crypto.publicEncrypt(pubKey,Buffer.from(message,"utf8" ));console .log("encrypted by public key:" + enc_by_pub.toString("hex" ));let dec_by_prv = crypto.privateDecrypt(prvKey,enc_by_pub);console .log("decrypted by private key:" + dec_by_prv.toString("utf8" ));
封装Crypto作为egg.js 专用加密函数
安装 npm install crypto --save
配置文件配置 config / config.default.js
1 2 3 config.crypto = { secret : 'ghdgw@45njashdaksh2!#@3nxjdas_*672' };
扩展application对象 app / extend / application.js
1 2 3 4 5 6 7 8 9 10 11 12 13 14 const jwt = require ('jsonwebtoken' );const crypto = require ('crypto' );module .exports = { get jwt () { return jwt; }, cryptoHmac (param ) const hmac = crypto.createHash("sha256" ,this .config.crypto.secret); hmac.update(param); return hmac.digest("hex" ); } }
上传 path模块 egg 单文件上传
获取路径:path.dirname(filepath)
1 2 3 4 const path=require ("path" ); var filepath='/node/base/path/test.js' ; console .log( path.dirname(filepath) )
获取文件名:path.basename(filename)
1 2 3 const path = require ("path" ); console .log(path.basename("/node/base/path/test.js" ,".js" ));
获取扩展名:path.extname(filepath)
1 2 3 const path = require ("path" ); console .log(path.extname("/node/base/path/test.js" ,".js" ));
文件路径分解/组合
1
2
3
4
5
const path=require ("path" );path.join("/temp" ,'node' ,'/js/test.js' ) path.join("/temp" ,'node' ,'/js/test.js/' ,'..' )
单文件上传 egg 单文件上传
文档:https://eggjs.org/zh-cn/basics/controller.html
1 2 3 4 5 6 7 8 9 10 11 12 13 14 15 16 17 18 19 20 21 22 23 24 25 26 27 28 29 30 31 32 33 34 35 36 37 38 39 40 41 42 43 44 45 46 47 48 'use strict' ;const Controller = require ('egg' ).Controller;const path = require ('path' )const fs = require ('fs' )const sendToWormhole = require ('stream-wormhole' );class UserController extends Controller async upload ( const { ctx } = this const stream = await ctx.getFileStream() const file_name = path.basename(stream.filename) const upload_path = 'app/public/admin/uploads/' + file_name const writeStream = fs.createWriteStream(upload_path) let result; try { result = await stream.pipe(writeStream) } catch (err) { await sendToWormhole(stream) throw err } ctx.body = { url : upload_path, fields : stream.fields } } } module .exports = UserController;
使用 pump 插件上传
1 2 3 4 5 6 7 8 9 10 11 12 13 14 15 16 17 18 19 20 21 22 23 24 25 26 27 28 29 30 31 32 33 34 35 36 37 38 39 40 41 'use strict' ;const Controller = require ('egg' ).Controller;const path = require ('path' )const fs = require ('fs' )const pump = require ('pump' )class UserController extends Controller async upload ( const { ctx } = this const stream = await ctx.getFileStream() const file_name = path.basename(stream.filename) const upload_path = 'app/public/admin/uploads/' + file_name const writeStream = fs.createWriteStream(upload_path) await pump(stream, writeStream) ctx.body = { url : upload_path, fields : stream.fields } } } module .exports = UserController;
多文件上传 egg 多文件上传
如果要获取同时上传的多个文件,不能通过ctx.getFileStream()来获取
用户可以通过在config/config.default.js中配置来新增支持的文件扩展名,或者重写整个白名单https://github.com/eggjs/egg-multipart
1 2 3 4 5 module .exports = { multipart : { fileExtensions : [ '.apk' ] }, };
1 2 3 4 5 module .exports = { multipart : { whitelist : [ '.png' ], }, };
1 2 3 4 5 6 7 8 9 10 11 12 13 14 15 16 17 18 19 20 21 22 23 24 25 26 27 28 29 30 31 32 33 34 35 36 37 38 39 40 41 42 43 44 45 46 47 48 49 50 51 52 53 54 55 56 57 58 'use strict' ;const Controller = require ('egg' ).Controller;const path = require ('path' )const fs = require ('fs' )const pump = require ('pump' )class UserController extends Controller async uploadMore ( const {ctx} = this const parts = ctx.multipart({ autoFields :true }) const files = [] let stream while ( ( stream = await parts() ) != null ) { if (!stream.filename) { ctx.throw('请选择上传的图片!' ) return } const filename = stream.filename.toLowerCase() const fieldname = stream.fieldname const target = 'app/public/admin/uploads/' +path.basename(filename) const writeStream = fs.createWriteStream(target) await pump(stream, writeStream) files.push({ [fieldname]: target }) } ctx.body = { files, fields :parts.field } } } module .exports = UserController;
按照日期存储 基于egg 封装公共上传类
配置上传路径 config.default.js
1 2 3 4 5 6 7 8 9 config.multipart = { fileExtensions : [ '.apk' ] } const userConfig = { upload_path : 'app/public/admin/uploads' };
2.导入上传类
1 2 3 4 5 6 7 8 9 10 11 12 13 14 15 16 17 18 19 20 21 22 23 24 25 26 27 28 29 30 31 32 33 34 35 36 37 38 39 40 41 42 43 44 45 46 47 48 49 50 51 52 53 54 55 56 57 58 59 60 61 62 63 64 65 66 67 68 69 70 71 72 73 74 75 76 77 78 79 80 81 82 83 84 85 86 87 88 89 90 91 92 93 94 95 96 97 98 99 100 101 102 'use strict' ;const Service = require ('egg' ).Service;const sd = require ('silly-datetime' )const path = require ('path' )const fs = require ('fs' )const mkdirp = require ('mz-modules/mkdirp' )const pump = require ('mz-modules/pump' )class UploadService extends Service async uploadMoreAndSingle ( const { ctx } = this let parts = ctx.multipart({ autoFields : true }) let files = {} let stream while ((stream = await parts()) != null ) { if (!stream.filename) { ctx.throw('请选择上传的图片!' ) return } let filename = stream.filename.toLowerCase() let fieldname = stream.fieldname let dir = await this ._getUploadDir(filename) let target = dir.uploadDir let writeStream = fs.createWriteStream(target) await pump(stream, writeStream) files = Object .assign(files, { [fieldname]: dir.saveDir }) } return { files, fields : parts.field } } async _getUploadDir (filename ) const today = sd.format(new Date (), 'YYYYMMDD' ) const upload_dir = path.join(this .config.upload_path, today) await mkdirp(upload_dir) const d = (new Date ()).getTime() const file_dir = path.join(upload_dir, `${d} ${path.extname(filename)} ` ) return { uploadDir : file_dir, saveDir : file_dir.slice(3 ).replace(/\\/g , '/' ) } } } module .exports = UploadService;
工具函数 egg常用工具函数 数值转整形 extend / helper.js
1 2 3 4 5 6 7 8 'use strict' ;module .exports = { parseInt (string ) if (typeof string === 'number' ) return string; if (!string) return string; return parseInt (string) || 0 ; }, };
筛选字段 1 2 3 4 5 6 7 8 9 filterFields (field ) const fields = field.split(';' ).filter(f => return fields.length === 0 ? '' : fields; } const { field = '' } = ctx.queryconst fields = ctx.helper.filterFields(field)
缓存 配置缓存插件 egg-redis 文档:https://www.npmjs.com/package/egg-redis
1 2 3 4 5 6 Change ${app_root}/config/plugin.js to enable redis plugin: exports .redis = { enable : true , package : 'egg-redis' , };
设置redis连接
1 2 3 4 5 6 7 8 9 10 11 12 Configure redis information in ${app_root}/config/config.default.js: Single Client config.redis = { client : { port : 6379 , host : '127.0.0.1' , password : 'auth' , db : 0 , }, }
封装常用redis操作类
1 2 3 4 5 6 7 8 9 10 11 12 13 14 15 16 17 18 19 20 21 22 23 24 25 26 27 28 29 30 31 32 33 34 35 36 37 38 39 40 41 42 43 44 45 46 47 48 49 50 51 52 53 54 55 56 57 58 59 60 'use strict' ;const Service = require ('egg' ).Service;class CacheService extends Service async set (key,value,expir=0 ) const { redis } = this .app if (expir === 0 ) { return await redis.set(key, JSON .stringify(value)) } else { return await redis.set(key, JSON .stringify(value), 'EX' , expir) } } async get (key ) const { redis } = this .app const result = await redis.get(key) return JSON .parse(result) } async incr (key, number=1 ) const { redis } = this .app if (number === 1 ) { return await redis.incr(key) } else { return await redis.incrby(key, number) } } async strlen (key ) const { redis } = this .app return await redis.strlen(key) } } module .exports = CacheService;
设置缓存 set 设置普通类型的值
1 set(key: string, value : string expiryMode: string[ EX 秒 PX 分钟 ], time : number )
key: 键名称
1 2 await this .app.redis.set('gender' , '男人' , 'EX' , 10 )
expire 为一个key重新设置过期时间 1 await this .app.redis.expire('name' , 20 ) 秒
rpush 数组右侧新增 1 2 3 4 5 6 7 await this .app.redis.rpush('userList' ,'张三' )await this .app.redis.rpush('userList' ,'李四' )await this .app.redis.rpush('userList' , '王五' )返回一个数组 ['张三' ,'李四' , '王五' ]
lpush 数组左边新增 1 2 3 4 5 6 await this .app.redis.lpush('userList' , '数组左边新增的' )[ "数组左边新增的" , "张三" , "张三" , ]
sadd 创建一个集合 1 2 3 await this .app.redis.sadd('setList' , '张三' ,'李四' ,'赵六' )返回值:['张三' , '李四' , '赵六' ]
hset 设置哈希类型 就是存储一个对象 1 2 3 4 5 6 7 8 9 10 11 await this .app.redis.hset('loginUser' , 'id' , 1 )await this .app.redis.hset('loginUser' , 'uname' , '张三' )await this .app.redis.hset('loginUser' , 'phone' , '18888888888' )await this .app.redis.hset('loginUser' , 'address' , '北京市朝阳区' ){ "id" : "1" , "uname" : "张三" , "phone" : "18888888888" , "address" : "北京市朝阳区" }
hmset 一次性设置多个值 1 await this .app.redis.hmset('userInfo' ,'name' ,'张三' ,'age' ,18 ,'address' ,'回龙观' )
获取缓存 get 获取普通类型的值 1 2 await this .app.redis.get('gender' )
type 获取数据类型 1 2 ctx.body = await this .app.redis.type('name' ) 返回 string
lrange 获取 list 类型中所有数据 1 2 3 4 5 6 7 ctx.body = await this .app.redis.lrange('userList' ,0 ,-1 ) [ "张三" , "张三" , "李四" , ]
smembers 获取集合中的所有数据 1 2 3 4 5 6 await this .app.redis.smembers('setList' )[ "张三" , "李四" , "赵六" ]
hgetall 获取哈希类型所有数据 1 2 3 4 5 6 7 8 ctx.body = await this .app.redis.hgetall('loginUser' ) { "id" : "1" , "uname" : "张三" , "phone" : "18888888888" , "address" : "北京市朝阳区" }
hget 获取 Hash 指定数据 1 ctx.body = await this .app.redis.hget('loginUser' , 'address' )
hmget 一次性获取多个值 1 2 3 4 5 6 7 await this .app.redis.hmget('userInfo' , 'name' ,'age' ,'address' )[ "张三" , "18" , "回龙观" ]
删除缓存 del 清空指定缓存 1 await this .app.redis.del('name' )
flushall 清空所有缓存 1 await this .app.redis.flushall()
lpop 从数组最左边删除一项 1 await this .app.redis.lpop('userList' )
rpop 从数组最右边删除一项 1 await this .app.redis.rpop('userList' )
消息队列 egg-amqplib 基于 rabbitmq 消息队列封装的库https://github.com/zubincheung/egg-amqplib https://github.com/zubincheung/egg-amqplib/blob/master/test/fixtures/apps/amqplib-test/app/controller/home.js
1 2 3 4 5 6 7 8 9 10 11 12 13 14 15 16 17 18 19 20 21 22 23 24 25 26 27 28 29 30 31 32 33 34 35 36 'use strict' ;const Controller = require ('egg' ).Controller;const queueName = 'test' ;class HomeController extends Controller async publish ( const { msg } = this .ctx.query; const ch = await this .app.amqplib.createChannel(); await ch.assertQueue(queueName, { durable : false }); const ok = await ch.sendToQueue(queueName, Buffer.from(msg)); await ch.close(); this .ctx.body = ok; this .ctx.status = 200 ; } async consume ( const ch = await this .app.amqplib.createChannel(); await ch.assertQueue(queueName, { durable : false }); const msg = await new Promise (resolve =>msg => if (msg !== null ) { ch.ack(msg); await ch.close(); this .ctx.status = 200 ; this .ctx.body = { msg : msg.content.toString() }; } else { this .ctx.status = 500 ; } } } module .exports = HomeController;
安装 rabbitMQ 安装
安装rabbitmq-plugins enable rabbitmq_management
打开浏览器 http://localhost:15672/ 默认账号:guest 密码:guest
创建一个管理员
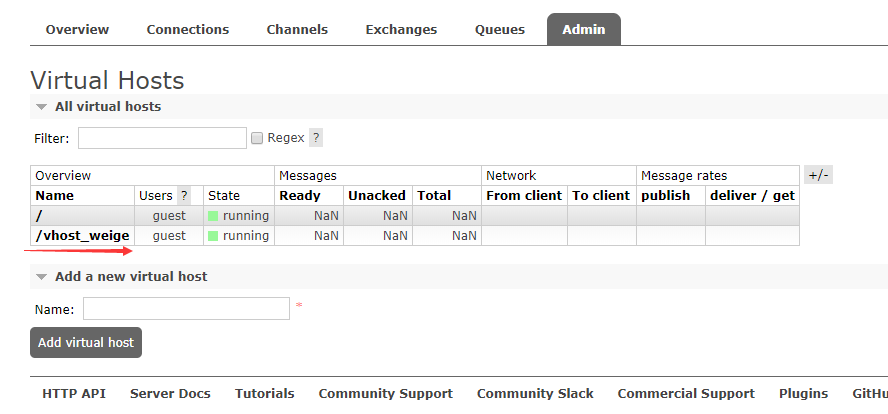
virtual hosts
virtual hosts 相当于 mysql 的数据库 数据库1 数据库2 数据库3…
创建一个 virtual hosts 库,相当于添加一个数据库
名字以 / 开头
为用户授权这个库
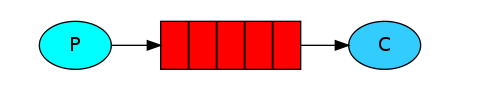
简单队列 MQ 简单队列实战
模型:
P 是我们的生产者
代码演示:
1 2 3 4 5 6 7 8 9 10 11 12 13 14 15 16 17 18 19 20 21 22 23 24 25 26 27 28 29 30 31 32 33 34 35 36 37 38 39 40 41 42 43 44 45 46 47 48 49 50 51 52 53 54 'use strict' ;const Controller = require ('egg' ).Controller;const queueName = 'hasone' class UserController extends Controller async send ( const { msg } = this .ctx.query const ch = await this .app.amqplib.createChannel(); await ch.assertQueue(queueName, { durable : false } ); const ok = await ch.sendToQueue(queueName, Buffer.from(msg)); await ch.close(); this .ctx.body = ok; this .ctx.status = 200 ; } async work ( const ch = await this .app.amqplib.createChannel(); await ch.assertQueue(queueName, { durable : false }); const resultMsg = await new Promise (resolve =>msg =>noAck : true })); if (resultMsg !== null ) { ch.ack(resultMsg); await ch.close(); const { content } = resultMsg; this .status = 200 ; this .ctx.body = { msg : content.toString() } } else { this .ctx.body = '队列消费失败' this .ctx.status = 500 ; } } } module .exports = UserController;
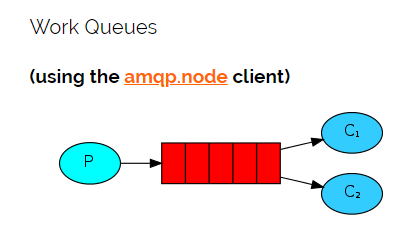
工作队列 rabbitMQ 工作队列 轮询分发
简单队列是一对一的关系,一个生成者对应一个消费者,实际开发中,一般消费者是以业务相结合的,需要时间去处理业务,如果只有一个消费者,那么生产者就会积压很多消息,消费不出去
代码演示:
1 2 3 4 5 6 7 8 9 10 11 12 13 14 15 16 17 18 19 20 21 22 23 24 25 26 27 28 29 30 31 32 33 34 35 36 37 38 39 40 41 42 43 44 45 46 47 48 49 50 51 52 53 54 55 56 57 58 59 60 61 62 63 64 65 66 67 68 69 70 71 72 73 74 75 76 77 78 79 80 81 82 83 84 85 86 87 88 89 90 91 92 93 94 95 96 97 98 99 100 101 102 103 104 105 106 107 108 109 110 111 112 113 114 115 116 117 118 119 120 121 122 123 124 'use strict' ;const Controller = require ('egg' ).Controller;const queueName = 'hasMany' class UserController extends Controller async send ( const { msg } = this .ctx.query; const ch = await this .app.amqplib.createChannel(); await ch.assertQueue(queueName, { durable : true }); let ok = null ; for (let i=0 ; i<50 ; i++) { ok = await ch.sendToQueue(queueName, Buffer.from(msg+i), { persistent : true }); } await ch.close(); this .ctx.body = ok; this .ctx.status = 200 ; } async work1 ( const ch = await this .app.amqplib.createChannel(); await ch.assertQueue(queueName, { durable : true }); ,需要手动 ack const resultMsg = await new Promise (resolve =>msg => setTimeout (() => { resolve(msg) }, 500 ) }, { noAck : false }) ); if (resultMsg !== null ) { const { content } = resultMsg; ch.ack(resultMsg); await ch.close(); this .ctx.body = { work1 : content.toString() }; this .ctx.status = 200 ; } else { this .ctx.body = '消费者1号失败' this .ctx.status = 500 } } async work2 ( const ch = await this .app.amqplib.createChannel(); await ch.assertQueue(queueName, { durable : true }); const resultMsg = await new Promise (resolve =>msg => setTimeout (() => { resolve(msg) }, 1000 ) }, { noAck : false }) ); if (resultMsg !== null ) { const { content } = resultMsg; ch.ack(resultMsg); await ch.close(); this .ctx.body = { work2 : content.toString() }; this .ctx.status = 200 ; } else { this .ctx.body = '消费者2号失败' this .ctx.status = 500 } } async work3 ( const ch = await this .app.amqplib.createChannel(); await ch.assertQueue(queueName, { durable : true }); const resultMsg = await new Promise (resolve =>msg => setTimeout (() => { resolve(msg) }, 1500 ) }, { noAck : false }) ); if (resultMsg !== null ) { const { content } = resultMsg; ch.ack(resultMsg); await ch.close(); this .ctx.body = { work3 : content.toString() }; this .ctx.status = 200 ; } else { this .ctx.body = '消费者3号失败' this .ctx.status = 500 } } } module .exports = UserController;
消息应答 消息应答 ack
noAck: false 手动接收消息模式
1 2 3 4 5 6 7 8 9 10 11 12 13 14 15 16 17 async consume ( const ch = await this .app.amqplib.createChannel(); await ch.assertQueue(queueName, { durable : false }); const msg = await new Promise (resolve =>msg =>noAck : false } )); if (msg !== null ) { ch.ack(msg); await ch.close(); this .ctx.status = 200 ; this .ctx.body = { msg : msg.content.toString() }; } else { this .ctx.status = 500 ; } }
邮件系统 nodeMailer egg.js 封装 nodeMailer 邮件发送类 文档:https://nodemailer.com/about/
安装:npm install nodemailer –save
邮箱授权:
使用nodemailer
1 2 3 4 5 6 7 8 9 10 11 12 13 14 15 16 17 18 19 20 21 22 23 24 25 26 27 28 29 30 31 32 33 34 const nodemailer = require ('nodemailer' );const transporter = nodemailer.createTransport({ service : 'qq' , secureConnection : true , port : 465 , auth : { user : 'xxxxx@qq.com' , pass : 'xxxxxxxxxx' , }, }); const mailOptions = { from : 'xxxxx@qq.com' , to : 'xxxx@xxx.com' , subject : '测试的邮件' , html : '<h2>测试一下:</h2><a class="elem-a" href="https://baidu.com"><span class="content-elem-span">测试链接</span></a>' , }; await transporter.sendMail(mailOptions, function (err, info ) if (err) { console .log(err); return ; } console .log(info); });
简单封装
1 2 3 4 5 6 7 8 9 10 11 12 13 14 15 16 17 18 19 20 21 22 23 24 25 26 27 28 29 30 31 32 33 34 35 36 37 38 39 40 41 42 43 44 'use strict' ;const Service = require ('egg' ).Service;const nodemailer = require ('nodemailer' );const user_email = 'example@qq.com' ;const auth_code = 'xxxxxx' ;const transporter = nodemailer.createTransport({ service : 'qq' , secureConnection : true , port : 465 , auth : { user : user_email, pass : auth_code, }, }); class ToolService extends Service async sendMail (email, subject, text, html ) const mailOptions = { from : user_email, to : email, subject, text, html, }; try { await transporter.sendMail(mailOptions); return true ; } catch (err) { return false ; } } } module .exports = ToolService;
在测试controller中调用, app/controller/test.js
1 2 3 4 5 6 7 8 9 10 11 12 13 14 15 16 17 18 19 20 21 22 23 24 25 26 27 28 29 30 31 'use strict' ;const Controller = require ('egg' ).Controller;class TestController extends Controller async testSendMail ( const ctx = this .ctx; const email = 'xxxxxx@163.com' ; const subject = '测试邮件' ; const text = '这是一封测试邮件' ; const html = '<h2>测试一下::</h2><a class="elem-a" href="https://baidu.com"><span class="content-elem-span">测试链接</span></a>' ; const has_send = await this .service.tool.sendMail(email, subject, html); if (has_send) { ctx.body={ message : '发送成功' , }; return ; } ctx.body={ message : '发送失败' , }; } } module .exports = TestController;
第三方模块 生成随机数 random 生成随机数包
文档:https://www.npmjs.com/package/random
1 2 3 4 5 6 7 8 9 10 11 12 13 14 15 16 17 18 19 20 21 22 23 const jwt = require ('jsonwebtoken' )const random = require ('random' )module .exports = { get jwt () { return jwt }, random (min=1000 , max=9999 ) return random.int(min, max) }, returnBody (code=0 ,msg='' ,httpCode=200 ,data={} ) this .status = httpCode this .body = { code, msg, data } } }
JWT JWT鉴权 基于JSON WEB TOKEN 封装 中间件鉴权
导入 jsonwebtoken 包https://www.npmjs.com/package/jsonwebtoken npm install jsonwebtoken
egg 框架配置
1 2 3 4 5 config.jwt = { secret : 'bcrypt' ,expiresIn : 60 *60 *2 }
secret : token 加密密钥
app / extend / context.js 扩展 ctx 属性
1 2 3 4 5 6 7 8 9 10 11 12 13 14 15 16 17 18 19 20 21 const Cryptojs = require ('crypto-js' );const jwt = require ('jsonwebtoken' );module .exports = { get jwt () { return jwt }, returnSucc (msg='成功' , code=0 , httpCode=200 ) throw new global .myErrors(msg, code, httpCode) }, returnError (msg='失败' , code=1 , httpCode=400 ) throw new global .myErrors(msg, code, httpCode) }, crypto (value ) return Cryptojs.HmacSHA256(value, 'drw_admin888' ).toString(); } }
配置中间件
1 2 3 4 5 6 7 8 config.middleware = ['errorHandler' , 'auth' ]; config.auth = { allowed : [ '/api/v1/user/register' , '/api/v1/user/login' ] }
allowed:不需要token验证的路由
书写中间件
1 2 3 4 5 6 7 8 9 10 11 12 13 14 15 16 17 18 19 20 21 22 23 24 25 26 27 28 29 30 31 32 33 34 35 36 module .exports = (options, app ) => { return async (ctx, next) => { if (options.allowed.indexOf(ctx.request.url) > -1 ) return await next(options); const { authorization = '' } = ctx.header; if (!authorization) ctx.returnError('您没有权限访问该接口!' , 0 , 401 ); let token = authorization.replace('Bearer ' , '' ) let user = {}; try { user = ctx.jwt.verify(token, app.config.jwt.secret) } catch (err) { err.name === 'TokenExpiredError' ? ctx.returnError('token 已过期! 请重新获取令牌' ) : ctx.returnError('Token 令牌不合法!' ); } ctx.auth = { uid : user.uid, scope : user.scope } await next(options); } }
生成Token JSON WEB TOKEN 生成令牌 扩展egg中的app对象,使用app.generateToken() 生成token
1 2 3 4 5 6 7 8 9 10 const jwt = require ('jsonwebtoken' );module .exports = { generateToken ( params={} ) return jwt.sign(params, this .config.jwt.secret, { expiresIn : this .config.jwt.expiresIn }) } }
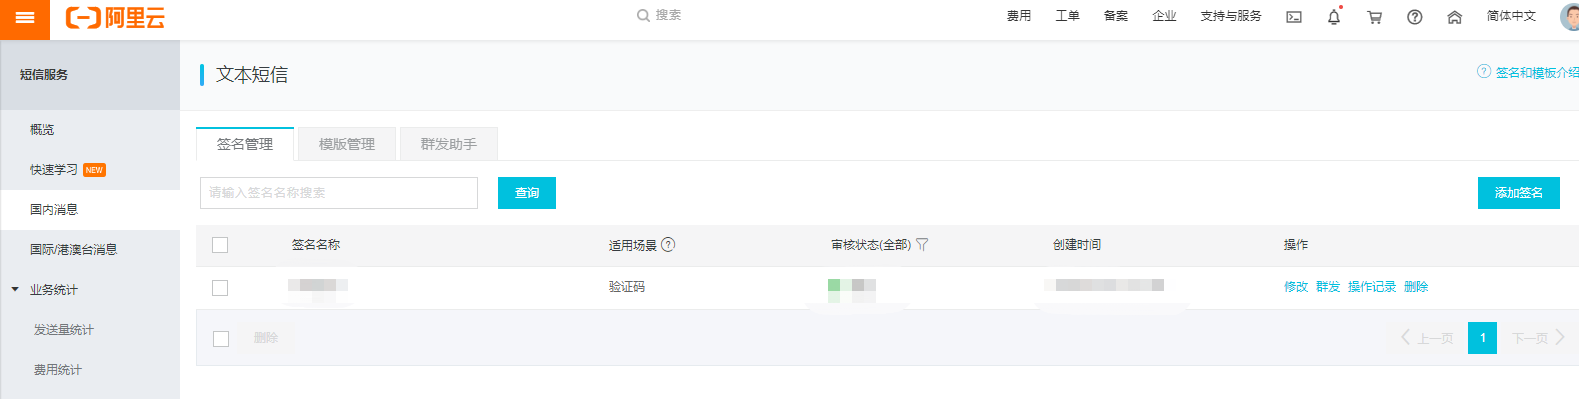
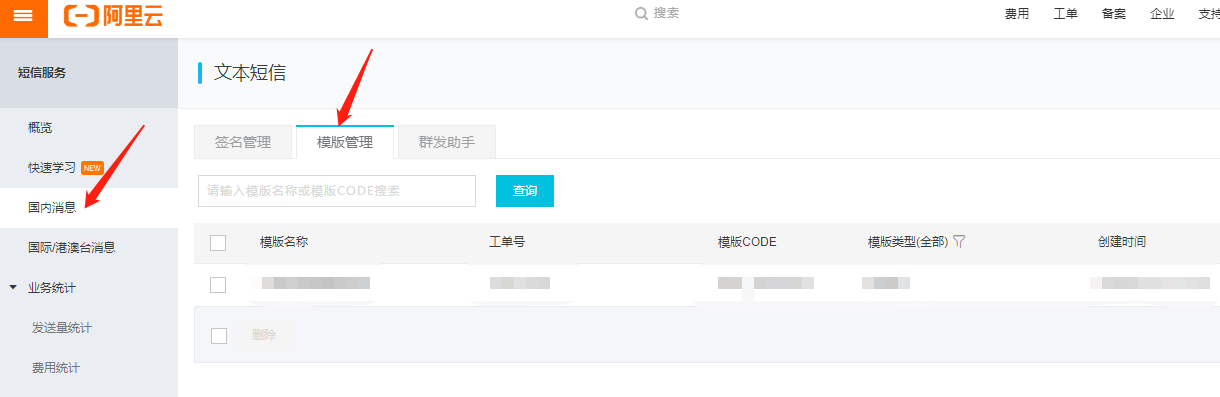
短信服务 阿里短信验证码 egg 集成阿里短信验证码
安装Node.js SDKhttps://help.aliyun.com/document_detail/112185.html?spm=a2c4g.11174283.6.634.36bf2c42lebO4R
阿里控制器 添加签名
添加一个短信模板
生成短信发送NodeJS类
封装阿里生成的类,适用于eggJS
app / service / alisms.js 新建一个短信发送的服务类
详情请看附录
新建一个 api.js 专属配置文件,然后合并到主配置文件 config / config.default.js
1 2 3 4 5 6 7 8 9 10 11 12 13 14 15 16 17 18 19 20 config / api.js module .exports = { aliSMS: { isopen : true , expire : 60 , accessKeyId : '' , accessSecret : '' , regionId : '' , product : '' , version : '' , SignName : '' , TemplateCode : '' } }
发送短信逻辑 egg 发送短信逻辑 service
1 2 3 4 5 6 7 8 9 10 11 12 13 14 15 16 17 18 19 20 21 22 23 24 25 26 27 28 29 30 31 32 33 34 35 36 37 38 39 40 41 42 43 44 45 46 'use strict' ;const Service = require ('egg' ).Service;class UserService extends Service async sendCode ( const { phone } = this .ctx.request.body; const sendCodePhone = await this .service.cache.get(`sendCode_${phone} ` ); if (sendCodePhone) this .ctx.errorHandle('您操作的太快了,验证码还未过期!' , {}, 30001 ); const randomCode = this .ctx.random(); if (!this .config.aliSMS.isopen) { await this ._devCode(phone, randomCode); } const ret = await this .service.alisms.sendSMS(phone, randomCode); if (ret.Code === "OK" ) { this .service.cache.set(`sendCode_${phone} ` , randomCode, this .config.aliSMS.expire); this .ctx.succHandle('发送验证码成功!' ); } } async _devCode (phone, randomCode ) this .service.cache.set(`sendCode_${phone} ` , randomCode, this .config.aliSMS.expire); this .ctx.succHandle('请求验证码成功!' , { randomCode }, 30002 ); } } module .exports = UserService;
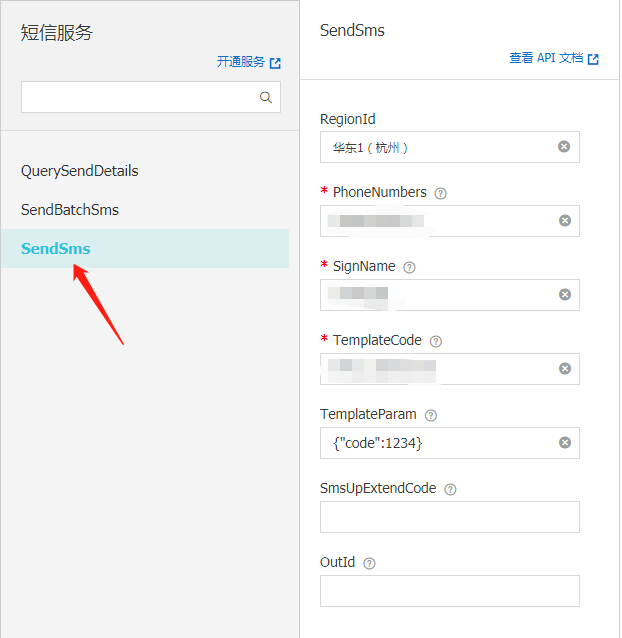
阿里短信Node类 封装基于eggJS短信发送类 Service 层
1 2 3 4 5 6 7 8 9 10 11 12 13 14 15 16 17 18 19 20 21 22 23 24 25 26 27 28 29 30 31 32 33 34 35 36 37 38 39 40 41 42 43 44 45 46 47 48 49 50 51 52 53 54 55 56 57 58 59 60 61 62 63 64 65 66 67 68 69 'use strict' ;const Core = require ('@alicloud/pop-core' );const Service = require ('egg' ).Service;class AlismsService extends Service async sendSMS (phone, code ) const client = await this ._client(); const params = await this ._params(phone, code); const requestOption = await this ._requestOption(); try { const ret = await this ._send(client, params, requestOption); return JSON .parse(ret); } catch (err) { this .ctx.errorHandle(err) } } async _client ( return new Core({ accessKeyId : this .config.aliSMS.accessKeyId, accessKeySecret : this .config.aliSMS.accessSecret, endpoint : 'https://dysmsapi.aliyuncs.com' , apiVersion : '2017-05-25' }); } async _params (phone, code ) return { "RegionId" : this .config.aliSMS.regionId, "PhoneNumbers" : `${phone} ` , "SignName" : this .config.aliSMS.SignName, "TemplateCode" : this .config.aliSMS.TemplateCode, "TemplateParam" : `{\"code\":${code} }` } } async _requestOption ( return { method : 'POST' } } async _send (client, params, requestOption ) return new Promise ((resolve, reject ) => { client.request('SendSms' , params, requestOption).then((result ) => { resolve(JSON .stringify(result)) }, (ex ) => { reject(ex) }) }) } } module .exports = AlismsService;